« November 2007 | Main | January 2008 »

December 29, 2007

High Speed Internet

Last year when AT&T bought Bellsouth they had to agree to make DSL available for only $10 per month to existing phone customers who did not yet have DSL service with Bellsouth. They started offering this in July or so. But they also were required to offer DSL service without phone service for $19.95 per month to anyone in the Bellsouth service area. My plan was to wait for this and then drop my home phone service (about all I use my home phone for is dial-up internet and receiving unsolicited phone calls from my credit card company and non-profit organizations). The DSL service would actually cost less than my phone line. According to today's paper, they started offering this on December 20, calling it FastAccess DSL Direct. The plan is actually DSL Lite, their slowest service with speeds "up to" 768 kilobits per second. My dialup is up to 50.6 kbps and right now is 48 kbps, so it should be a big speed upgrade even though AT&T offers plans of up to 3,000 kbps and 1,500 kbps.

The only catch is that you have to pay $75 for a modem. If you order DSL service over the web you can get a rebate of the $75, but you can only order the stand-alone DSL service over the phone. AT&T has to offer the $19.95 service for 30 months, so over a couple of years I wasn't worried about the $75 for the modem. I called the toll-free number, 1-800-626-9149, waited on hold for about 20 minutes, and was ready to order. They were even going to cancel my phone service at the same time. I asked if there was any way to order this online so that I didn't have to pay $75 for the modem. They said I could go ahead and order DSL lite online, get the modem, file the rebate, and then call AT&T and have them cancel my phone service and start giving me the $19.95 deal. So I'm going to try that. I can't do it right now because they initiated an order for me and I have to wait a couple of hours before that order will be out of the system. It's like waiting 2 hours to go swimming after you eat lunch.


December 26, 2007

Roth IRA

In January I decided to put my 2007 Roth IRA contribution in Vanguard's total international fund. The total fund includes some exposure to emerging markets which was a very good thing since Vanguard's emerging markets fund was up 40% compared to 11% for developed markets. This lifted the total fund up to 14% for the year.

The growth half of the S&P 500 index fund did very well with a 15% return, vs. 7.5% for the 500 index (my small cap value index fund actually lost about 4%). Whereas last year my do-good FTSE Social Index fund had outperformed the growth index, this year it got walloped and FTSE actually lost a little bit of money (-0.5%). So I will lose my social conscience and put that money elsewhere. I didn't mind when there was a little bit of a spread between the two, but 15.5% is just too much.

Meanwhile, this year as well as last year my Fidelity Small Cap fund had enormous distributions of capital gains. This year it distributed over 15% of its value, which I then have to pay taxes on, even though the fund only increased 7.5% (at least most of the distribution is long term gains which are taxed at only 15%). The share price actually went down, though I now have more shares since the distributions were reinvested. Meanwhile, Vanguard's index funds have minimal distributions since they pretty much stay in the same funds all the time.This is something that has always bugged me about Fidelity funds. Even when the funds don't do that well, they still have substantial distributions from the enormous turnover in their funds.

Anyway, this year's huge distribution made me realize that this fund belongs in an IRA account where I don't have to worry about paying taxes on the distributions. So I decided I would transfer my maximum for 2008, $5,000, into a new Fidelity Roth IRA account from my current taxable holdings. While I was at it, I would also move the money I have in Vanguard's Social Index fund into a Fidelity fund. Based on past performance, both Capital Appreciation, Independence, and Fidelity Fifty look pretty good. Contrafund, which was one of the first mutual funds I ever bought (and sold to buy my house) is closed to new investors, but had a very good year.

So today I set up an account. You can do a transfer of assets from one company's Roth IRA to another company's without it counting as a taxable withdrawal. I hoped this could be done online or over the phone, but I went to Fidelity's website, set up an account, and at the end they had me print a form out that I needed to sign and mail in to them along with my most recent Vanguard statement. Only then will they be able to get the funds from Vanguard. They said it could take 2-3 weeks, so it isn't fast, but I don't guess it matters.


December 20, 2007

Power Consumption Down

After getting the new fridge I was hoping my electricity bills would go down noticeably. But I wasn't sure how much. Fortunately winter is a good time to see because electricity use is fairly consistent (in the summer it just depends on how hot it is). In November my average energy consumption has been 395 kilowatt-hours. But this past November, with the new fridge only installed for a couple of weeks, energy use was 312. It was my lowest November total ever (though the billing period was only 28 days). I got my December bill this week and it was my lowest number ever: 281 kwh (in 31 days), well below the December average of 400. That comes out to a savings of about $13 per month. I don't know that the refrigerator is entirely to blame: the weather has been fairly warm so the fans for the heating system haven't been running much. Also there is a writer's strike and I'm not doing Netflix, so my TV watching has been down. I'm always putting in more compact fluorescent lights (I'm up to at least 15), so maybe there is some savings there as well. But it's looking like I will be able to save $10 a month with the new fridge.


December 13, 2007

Building the MintyBoost

Although my own homemade Band Aids Battery Pack still works fine with newer iPods (and just about anything else that charges via a car adapter), I still wanted to try to build the very popular and ingenious MintyBoost charger, which was invented and thoroughly documented by Limor Fried (aka ladyada) on Instructables and then later updated on her own website. I had written about it when it first came out but couldn't use it at the time since my 3G iPod would only charge via firewire. The advantage of the MintyBoost is that it only uses 2 AA batteries and charges via the iPod's USB cable. Due to Apple's varying implementation of USB requirements over time, no USB charger seems to work with every iPod let alone every USB device out there.

Now that I have an 8 GB 3G nano with video that charges via a USB cable, I thought I would try my hand at putting together a do-it-yourself electronics kit.

Though Limor says the MintyBoost is an easy project, this is in comparison to her other much more complicated projects. The challenge with the MintyBoost is the circuit board is very small (not much larger in area than a quarter) and crammed tightly with components in order to fit in the space left over after you put a 2-AA battery holder in an Altoids gum tin. I counted 32 different solder joints required. I have never really been able to solder anything. In 8th grade shop class I tried to solder a TV scrambler and I think I burned out a transistor because it never worked right. I kind of soldered some wires onto the lighter socket for my Band Aids project, but I didn't do a very good job. So the first thing I needed to do was learn to solder. I studied Limor's site thoroughly last weekend, reading the soldering tutorials, watching the online videos (very, very helpful), and reading her instructions. Then I bought all the right tools including the right type and diameter of solder, a Weller soldering iron (I learned that a 40-watt iron isn't really better than a 25-watt one), a vise to hold the project, and a "third hand" to hold whatever else I might need. Because I was worried about messing up, I also bought a solder sucker to help remove solder, and a length of soldering wick to also remove solder (I didn't end up using them and don't know how much use they would have been anyway but they were cheap).

Everything but the vise (backordered) arrived from one of Limor's recommended sellers, Electronix Express. It turns out I should have at least bought the soldering iron from Home Depot because Weller makes kits in two different packages. In addition to a standard tip, one includes a needle nose point for small electronics (like this project) and the other includes some bigger points for wood burning, which is what I wound up with. I was still able to get by with the standard tip, but Home Depot had both kits and for only $10 vs. $18 (I had tried Ace Hardware, but the store I visited was out of the kit and I kind of wanted the extra tips and stuff that came with the kit).

I got a decent deal on Altoids gum at Walgreens drug store where they had a buy-one-get-one-free special, but they only had peppermint flavor. So I had an extra tin in case something goes wrong (the gum is pretty good at first, with a crunch super minty shell like you would expect but the flavor fades pretty quickly and the gum itself isn't that good).

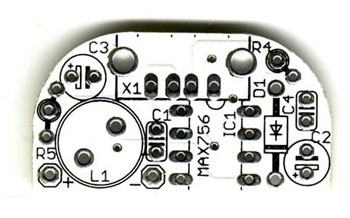
I was glad to get the kit from Limor when I did because she was down to her last few. However I checked on her inventory the next day and she had 45 kits in stock. A day or two later she was down to 27. She sells tons of these things! She can get pretty good prices by buying electronics in volume (and tells you where she gets the parts and how much they are in case you want to get them on your own) and then adds in profit. The key is getting her circuit board. Again, she gives you files where you can make your own if you have the equipment, but hers is very good quality and already cut to the right size. The whole kit is $19.50 but you can buy the board by itself for $5. Postage is extra but only a few dollars, so I paid $22.68 for one kit. It arrived quickly in a padded envelope with all of the components in a static-free bag sealed with a sticker with her logo and a link to her instructions page. She doesn't sell completed kits because she really wants people to try out soldering on their own. In addition to the instructions she has discussion forums that she checks on pretty frequently.


mintyboostpcb.jpg

Once I got the soldering iron, I had everything I needed except the vise. However I figured I could use the third hand to hold the work. So I could have saved some money by just getting that ($2.95, whereas the vise is $19.95). I practiced soldering by placing the cold tip on components and touching the solder to it. Then I tried soldering a couple of paper clips together just to get the hang of heating the work rather than the solder. I'm not so great at soldering paper clips. I also tried to desolder the paper clips by using the pump and the wick with very little success.

Despite that, I thought I could go ahead and try soldering the first three components onto the board. I had downloaded her page on soldering the pieces and followed it to the letter. When I first got the kit, I had put all the pieces on there just to make sure everything fit but couldn't solder them yet. But now I put the pieces in and bent the leads like she said so the pieces would stay in place with the board upside-down. Because the pads are very small, even with 0.031 inch diameter solder wire, it doesn't take much to finish the joint. It worked pretty much like it was supposed to. As long as the tip touches both the lead wire and pad on the circuit board they will heat up enough to melt the solder. And the solder will flow all over the pad and down the hole on its own.

The two biggest keys are not to overheat and not to oversolder. If the solder doesn't melt within about a second or two, then take the iron off of the work, let it cool a little and try placing the tip of the iron all over again. Maybe you need to reposition the work or reach it from a different angle this time. You definitely don't want to oversolder because removing the excess isn't easy and if you spill onto an adjacent pad, you will short everything out. If you undersolder, you could potentially add a little more later, though really you want to just do it once and get it right. In the end I had a few places that could probably use a little more solder, but I think the connections are still easily good enough. Step-by-step I kept adding components and soldering them in place. As recommended, I put the resistor, R5, in the "pull up" position (which works for my nano) which connect the two USB data pins to the positive terminal via the resistor. Soldering the USB clips was the best part because you got to really add a bunch of solder to those big joints with very little danger from overheating. I had some long nose pliers to clip the leads, but they didn't let me get in close enough. I ended up leaving the leads long until I was done and then went to Home Depot to get some side cutting snips instead which worked much better (they had one pair for $13, but I wound up buying a 15-piece kit of all kinds of pliers and two adjustable wrenches including a regular-size and mini pair of side cutters for only $20).

Once I was done, I tested out the circuit just as the instructions said to and, sure enough, I got 5.03 volts of output. That was a big moment of truth. I checked again and then connected my iPod which gave a charge indication in the top right of the screen. Holding down Pause to turn the iPod off, it immediately showed the active charging icon. Yay!

One thing I wasn't crazy about with Limor's tutorial was cutting down the side of the Altoids tin to make a notch that the USB port would slide down into. Instead I wanted to cut a hole, which would leave the rim along the top of the tin intact. I was able to do this by putting a piece of masking tape on the end of the tin, marking the size of the hole, and then drilling two small holes on each end of where the hole was supposed to be (the masking tape can be drawn on but also keeps the drill bit from slipping on the metal surface). Then I used larger and larger drill bits to enlarge those holes, using the previous holes as guides. Once I was done I kind of drilled out the leftover middle and then bought a small triangular file that let me form the corners. It turned out to be the most work of the whole project getting that just right and it still turned out a little rough. Limor's method is easier, but I think mine turned out better. The key is to place the hole so that the top of it is up as high as possible. Otherwise the USB port sticks out in a downward direction. Although the instructions don't call for it and I didn't do it, I think it would be a good idea to cut out some pieces of electrical tape and put them in the rounded corners of the tin as well as the bottom of the tin where the circuit board goes just to make sure none of the wires, leads, or whatever touch the tin and potentially short something out. Of course there is no problem if the USB port touches the tin and in fact it could be soldered in place (I haven't done this because I want to be able to remove the board, plus the double-stick foam tape holds it pretty securely anyway).

This was fun and easier to make than I thought it would be. The soldering only took an hour and could take far less if I knew what I was doing. Now that I have the equipment, I would like to make more of these. I thought maybe I could make them and sell them through my web page and maybe on eBay. One person sells them for $30. Although the kit is $20, if you are buying in quantity, you can get the parts directly from the same suppliers Limor uses (she sells the circuit boards for $5 by themselves and even tells you the prices she is paying) for less than $15 including the Altoids tin. If I sold them for $25 I could make $1,000 by building and selling 100 of them. However I would also have to lay out $1,500 up front to get all of the parts.


December 9, 2007

Versapak Rejuvenated!

When I first got my house ten years ago, I started buying some Black and Decker Versapak tools because I was needing several cordless tools and it seemed smart to have them all use the same battery. I wound up with a dustbuster, screwdriver, drill, and snakelight. Eventually the NiCad batteries stopped taking a charge and, although B&D had stopped selling Versapak tools, I was able to get two more batteries from Target. That was 2004, but one of the batteries went kaput pretty quickly and had stopped taking a charge at all. Since the dustbuster and drill both need two batteries, I needed something better than these memory-prone NiCad batteries. B&D makes "gold" versions of the batteries that are really NiMH batteries, so I ordered two of those last night. NiMH batteries don't have memory effect, but I worry that my charger won't work properly with NiMH (my conclusion was that it would work, but it might take twice as long to charge the batteries).

Versapak zapping

Today I searched eBay for "Versapak" and found a guy who was selling information for $12.95 on how to rejuvenate Versapak batteries. I'm no dummy, if there is that kind of knowledge available, it is free somewhere on the internet. I did find a site where you would get a transformer and a big resistor and could zap a battery back to life. That seemed complicated.

Then I searched more and learned about chemical "whiskers" that develop in NiCad batteries and cause them to stop charging (or, really, to stop giving off a charge). Searching further about whiskers, I found this page on Instructables. Though the guy uses a welder, basically he is just applying a large DC current to the battery which burns the whiskers out and restores the battery to normal. All he did was touch the ends to the battery. It gives off sparks and the battery is revived.

I don't have a welder, but I do have a car battery which has a lot of amperage. I put on some gloves and got my jumper cables. The + end of the Versapak battery is inside a hole on one end of the battery and the outside of the battery is negative. I found a bolt that would fit in the + hole and held the bolt in the jaws of the jumper cables. Then I put the - jumper clamp around the battery itself. Wearing gloves to keep myself from getting shocked, I stuck the bolt in the hole and got a few small sparks. I did it again for just a second or so. Is that all there was to it?

Yes. I took the battery back inside and hooked it up to my volt meter. Before the battery was giving off 0.01 mV. Now it was up to 4 V, just like the fully charged good one. I stuck it in my screwdriver. Power!

Amazing. However, the power didn't really last long. I am recharging the battery in its charger to see if I can get something closer to a full charge.


December 3, 2007

Family Portrait

I am the keeper of the address list for my Peace Corps group. So a few weeks before Christmas I send out an e-mail and ask for updated information. Last year I also asked people to submit a paragraph about what they have been up to if they wanted and put it together (like FOPAB). A couple of people sent pictures, which I hadn't really thought of, but since they did it I asked Susan to take a picture of me and the dogs for the newsletter. It isn't easy to get the dogs to stand still, let alone look in a certain direction. Austin was fairly easy because he would just lean on me, but Katie was always on the lookout for anything interesting (like a cute photographer).


December 1, 2007

Sell It on eBay

After realizing that I couldn't use the 4 GB memory card I had bought for my Palm and figuring nobody else would need it either, I decided to try selling it on eBay. I have shopped for electronics on eBay before and have generally been disappointed that the winning bids are usually higher than what you can get the same item for by shopping around. Plus most eBay sellers have ridiculous shipping rates that inflate the price further. Well, when you have something to sell, that all works to your advantage.

I have bought 5 things from eBay in 5 years and have never sold anything. But I figured it must be pretty easy. So Friday night I had about a half hour before picking up Susan for dinner and decided to try eBay out. I had already checked out similar items which were asking $20 plus $10 shipping for cards that were new in the box (about what mine had cost before the $25 rebate). First I took a picture of the memory card in the packaging. Then I signed in to my account and said I had something to sell. This started a wizard that steps you through the process. Based on my item description, eBay figured that the category for the item would be digital camera accessories, so that was fine. Then I uploaded the picture, which was free (additional pictures were 15 cents each). I set the list price at the default of 99 cents. Given the choice of Used and New, I chose Used (though it is really almost new). For payment options, I restricted payment to PayPal only. I typed in a longer description that said the packaging was opened and why I was selling it.

For shipping I figured I would need to buy a padded envelope which would cost about $1.00 and shipping would be about $1.50. So I entered $2.50 as the shipping price. It has always bugged me that people on eBay charge so much for shipping. This amount was rejected however and eBay said I had to enter a valid shipping rate. For priority mail and the lowest weight package (1 lb) the shipping would be $4.60. I figured it would really be cheaper than that so I didn't add in the $1.00 for the envelope. This was allowed. I don't understand that. The cost to run the auction was 20 cents. eBay then walked me through a system where the fees would be deducted at the end of the month automatically. I would also have to pay 5.25% of the winning price if the item sold.

Later on I told Jeb about the listing and he questioned my high shipping price. I explained and then went pack to see if I could come up with a lower rate by using first class shipping. Checking the Post Office website it turns out that $4.60 really is the minimum price for shipping anything by Priority Mail (not Express Mail which is even more). The price for shipping an "envelope containing a rigid object" that weighed 2 oz by First Class was only 75 cents. However, the only thing I could find on eBay that was cheaper than $4.60 was for parcel post and it was still over $3 so while I changed the shipping method to First Class, I left the shipping rate at $4.60. I think people will know to factor that into the bid. It also guarantees I'll get a little closer to what I wound up paying for the card which was $7 after sales taxes and the rebate.

On further thought I also changed the item description from "4GB SDHC Memory Card" to "4GB SD SDHC Memory Card (4 GB)" which should give better search results since people aren't likely to search for SDHC cards and could type in the capacity as "4 GB" or "4GB". I also changed the description a little and told people they should make sure their device is compatible with SDHC cards before bidding.

So it was probably good that I picked a 7-day bidding period because I may need the time to go back and tweak things further.

Here's the listing