Photo Blogging
Posting a photo or two in a blog can be useful, but not obvious Here is a summary and then details of how to do it.
1. Export photo reducing the size to something around 600 x 400 pixels. (No giant photos, please.)
2. Upload this "medium" size photo, creating an embedded thumbnail that is around 200 x 150 pixels.
3. Add the attribute border="2" so that it will make the thumbnail look clickable.
The size of photo files are getting much larger having gone from 1 megapixel to 5 megapixel in just a few years. Think 1 megabypte to 5 megabytes. This is good when you go to print, especially 8" x 10" photos, but these giant files are a waste of space for on-screen viewing and slows down viewing on the web.
For posting on the web or in blogs, the goal should be to put up as small a photo as possible and create a thumbnail that people can decide to zoom in on. MovableType supports uploading photos and creating thumbnails on the fly.
Step 1: Export your photograph to your desktop.
Choose the photo you want to post in your photo editing software (ex. iPhoto.) Choose to export the photo as a JPG and resize it. Choose a width around 600 pixels (about the width of this article) and let the software figure out the height automatically. Save it on your desktop.
Step 2: Upload the file to your blog.
MovableType has an "Upload File" command. Choose this and locate the photo on your desktop and then choose Upload.
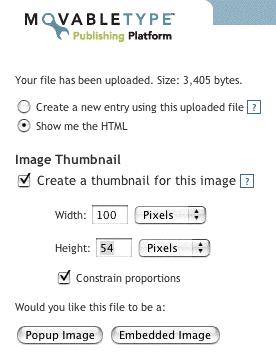
The next windows (seen below) give you choices. The default is to create a new entry, but I almost always change this to "Show Me the HTML" because I then copy and paste the HTML into the article I am already typing. If you start an article by uploading the photo, you can use the first choice.
 Choose "Create a thumbnail" and choose a width of 100 to 150. The Height will automatically calculate.
Choose "Embedded Image" so that the thumbnail will appear in the text. If you've chosen "Show me the HTML" you will see the code that you can copy and paste into your article. For this article, the code for the photo below looks like this:
<img alt="uploadphoto.gif" src="http://mac.fiveforks.com/jeb/ blog/archives/uploadphoto.gif" width="276" height="358" />
Step 3: After pasting the HTML code in this article, I added two attributes: border="2" and align="right".
<img alt="uploadphoto.gif" src="http://mac.fiveforks.com/jeb/ blog/archives/uploadphoto.gif" width="276" height="358" border="2" align="right"/>
You don't have to have the align, but adding a border of 1 or 2 pixels in width is a good idea.

I knew how to do this, but I havent followed it. I'll do it from now on. thanks!