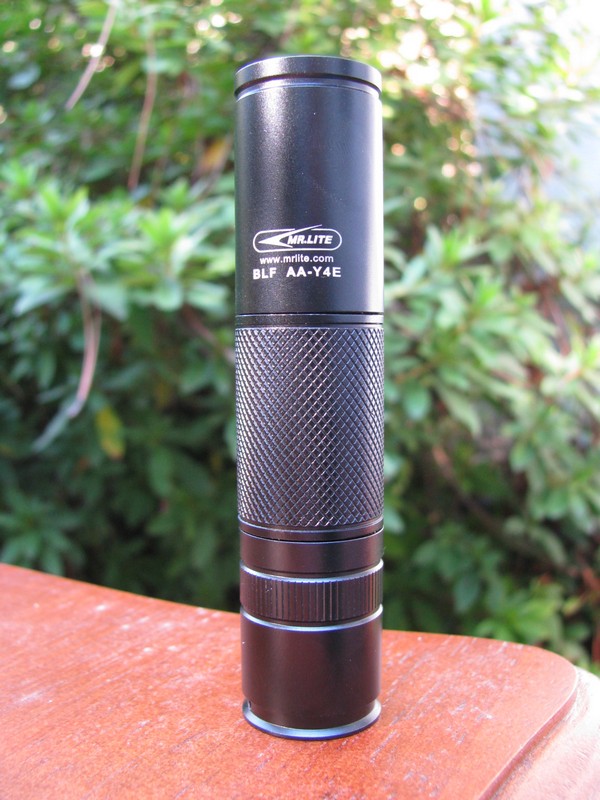
« October 2010 | Main | December 2010 »

November 29, 2010

New Flashlight Wiki

I have been learning a lot about flashlights over the last couple of years. As a way of keeping all of the information straight, I wrote a lot of articles for CandlePowerForum's Wiki. Their Wiki was pretty sad, but it became a really good resource that I could refer to. I don't know if that many people were using it, but it was helpful to me at least.

But the problem with the CPF Wiki was that it was under constant spam attacks. The administrator there took some steps to stop the spam but last week almost all of their pages were vandalized. I reported this to the admin and the user that had damaged the pages was blocked, but the vandalism was not undone. I certainly didn't want to fix all of those pages. I have offered to help administer the wiki in the past, but the administrator does not want any help. Also some pages are locked and the ability to upload images, which could be really helpful, has been turned off.

So I thought that rather than waste time fixing vandalism attacks that I am not allowed to control, I would just make my own wiki. You may recall that I already made a wiki when I was learning how to do computer drafting. That was really more of a personal wiki for stuff I was learning and could store code snippets since I knew I would be getting away from drafting for a while and didn't know when I would get back to it.

So I set up a new wiki this weekend. I moved a lot of what I had written at CPF over to the new one and re-did the front page which was locked on the old site. I also made a few changes and additions, so it is already more up-to-date than the original. I still wasn't 100% sure I would really set up my Wiki, but the more I did it, the more I knew this was the way to go. I looked for a good domain name, but flashlightwiki.com was taken as well as wikiflashlight.com, flashwiki.com, lightwiki.com, etc. (none of which were being used for anything; people just bought them and then parked them hoping someone would want to buy the domains from them). I did find that flashlight-wiki.com and candlewiki.com were not taken. I liked the play on words of candlewiki, but when I asked what Jeb thought, he said candlewiki needs to be about candles, not flashlights.

So today I went to godaddy.com and bought flashlight-wiki.com for $6. The host I use for igirder.com and lakeavondale.com already lets me add as many domains as I want as long as my total storage space and bandwidth don't exceed their limits. I'm using about half of my allotted storage space, but hardly any of my bandwidth, so I don't think the new wiki should break the account. The total cost for a year is really only $6, so it seems like there is nothing to lose.

To fight spam, I decided to allow editing only by "confirmed" users. So a person can sign up and then I have to confirm them. Based on my experience at CPF Wiki, there aren't going to be many people who really want to help, so I don't think there will be much maintenance in keeping up with confirmed users. But I may also have to purge unconfirmed users which has become a chore at lakeavondale.com where I do something similar and seem to get a couple of Russian-sounding "neighbors" signing up with Gmail accounts each day.

http://flashlight-wiki.com


November 28, 2010

Favicon

A lot of web pages include a very small icon that will show up in the URL when you are visiting the site and in your bookmarks when you bookmark that page. This feature was first introduced by Microsoft for Internet Explorer but other browsers picked it up. The icon file itself is usually called favicon.ico ("favicon" being short for favorites icon, since it shows up in your favorites). The one for this website is this:

mac5ico.png

I was playing around with creating a Flashlight Wiki as an alternative to the one I have been contributing to which has a lot of restrictions on it but still gets hit by spam all the time. I wanted to make a favicon for it, so I made a simple one at the required 16x16 pixels in Paint that was a bitmap that looks like this, which is what a flashlight LED looks like:

led.gif

Once I made a bitmap, I found an online tool that will convert a bmp file to an ico file and then saved that to my hard drive. The wiki itself is in a folder, but if you ever do an upgrade to the wiki software it is better if you don't have files you will need somewhere in the thousands of files that are part of the wiki installation. So I just put the file on the root of igirder.com. So then I needed to incorporate the code to make the icon part of the web page and found a tip where i could add a line to my localsettings file in my wiki folder that would point to it, by adding this line:

$wgFavicon = "$wgScriptPath/path/to/your/favicon.ico";

I visited the Wiki and the icon didn't show up right away, but after I refreshed there it was. Perfect!

Then I visited my home page and there it was again! I went to Wikipedia to look up favicons and the article said that the way it was originally set up, all you had to do to get a favicon to show up was to put the file in the same directory and the browser would automatically pick it up. After I read that, I remembered that's how it works. So because the icon was in my main folder, all of my web site's pages were showing up with the icon. No problem, I move the file to the wiki folder and modify the localsettings again to point to the right place.

But when I visit my non-wiki sites, it still shows the icon! And they are on my toolbar where I have shortcuts for my home page and movie review page. Plus I notice that when I load my home page, for some reason, I'm pulling something from specificclick.com which is not part of my web page. So now I'm thinking I've put some kind of virus in my icon that's doing who knows what. And I notice that my tiny little 16x16 icon has a size of 60kb which seems pretty excessive for a graphic that only has two colors.

It turns out specificclick is part of SiteMeter and there is some controversy about when they partnered with specificlick. And I don't think there was a virus, but I converted the bmp file in FastStone Image viewer and the size was smaller. Then I found a different online converter and got the size down to 1kb which is more like it. The colors were a little different, but at this size, I don't think it matters.

I still have the problem that the icon won't go away, but I guess I'm not infected and the file size is reasonable. But getting the icon out of Firefox's cache isn't easy. I cleared the history for the last hour and then for the whole day, and it was there. I restarted Firefox, reloaded my pages, deleted the bookmarks and put them back, and it was still there. Turns out this is a known problem and the solution involves installing some kind of database plug-in. But I also tried editing the bookmarks file and although I didn't modify the bookmarks because the icon didn't seem to be stored there anymore, when I tried to open Firefox, it wouldn't open anymore. This is a bigger problem than a funky favicon.

So I wound up uninstalling Firefox completely and then reinstalling which means I lose all of my bookmarks, all of my saved passwords, but at least the favicon is gone.


November 26, 2010

Microcontroller Programming

A driver for a flashlight is a circuit board with electronic components on it. The purpose is to take power from the battery, then modify that power level using the electronics, and send the output to the LED of the flashlight. For instance, to get a strobe the driver will turn the power to the LED on and off. A Low mode can be created by turning the light on and off faster than the human eye can detect. By decreasing the amount of time the LED pulses on, the light appears to get dimmer and dimmer. This is done using a microcontroller, which is just a chip that is soldered to the driver. One chip that seems to be used pretty often is the Atmel Tiny13. Some drivers have 5 modes (Low, Med, High, Strobe, SOS) and some have only 3. The only difference is in how the microcontroller works.

So a guy who was new to flashlights but had a background in electronics figured out that he could probably reprogram the microcontroller and get whatever number of modes he wanted, and he was able to write some code in C, compile it, upload it to the microcontroller on a flashlight driver board, and it worked! That's pretty neat because drivers don't always give you the Low and Medium modes at the level you want and too often include the flashy strobe and SOS modes that I don't really want.

Some lights can be programmed by the user. The AKOray K-106 that I have is a famous example of a budget flashlight with 3 programmable modes. You press the tail clicky 5 times to enter programming mode, and then set each of the 3 modes for the light. These are memorized. People love that flexibility, but the AKOray is kind of hard to find lately and doesn't come with more recent LED's or really have a high enough current to make LED's their brightest. So people have always wanted to tweak that driver for more output, but keep the programmability.

Well, the guy who wrote the program for the microcontroller, also wrote a program that would give a flashlight programmable modes like the AKOray. Well, I already have a few flashlights with Atmel microcontrollers, so theoretically if I got the equipment and software to re-program the Atmel chips, I could make those flashlights programmable.

So why wouldn't I do that? First I needed the hardware. This guy uses a $50 kit called an AVR Dragon, but there is a less expensive kit called USBasp that you can build, but you can also get pre-made ones on eBay and other places for about $12. It looks kind of like the guts of a USB flash drive, except on one end is a connector for ribbon cable. The ribbon cable has 10 wires that lead to the the different legs of the chip. If you are just programming loose chips, it is pretty easy. But to program a chip that is already soldered to a board you need to either solder wires to the legs or get a clip that grabs onto the chip and has wires where each leg of the chip is. You can get those for about $8. So I ordered those two a couple of weeks ago. I got the clip on Wednesday and today the USBasp programmer showed up.

Here is the USBasp board along with the clip and a flashlight driver board with the penny there for scale (everything is pretty small; the Atmel chip is the largest of the 4 black chips on the driver board):
avrstuff.jpg

For software you need quite a few different programs that all work together. The programs themselves are written in C, so you need a C compiler. Then you need something called Make that will compile the program into a file that can be loaded into the microcontroller's memory. And then you need some kind of interface software that can write the file to the chip using USBasp. That software is called AVRdude. All of this stuff has been developed into a kit called WinAVR by electronics enthusiasts who do all kinds of neat stuff with Atmel chips. Then I found out there is a pretty neat graphical user interface (GUI) that lets you work all of those tools in a Windows interface. This GUI is called Eclipse, but you have to also download and install an AVR plug-in that will interface with the WinAVR suite. The guy who wrote the programs for the flashlights uses Eclipse, so that seems to be the way to go.

I kind of got started using all of this stuff, but when I got to the part where I was supposed to read some information from the Atmel chip using the USBasp board, I got an error and I spent the rest of the day figuring it all out.

Here is the flashlight driver board with the legs (pins) of the Atmel chip numbered:
Atmel Tiny13

First, you can't just connect the clip to the USBasp board because the wires in the teeth of the clip don't match up correctly with where the pins on the USBasp chip are. So you have to figure out where each one goes. Fortunately you can move the wires around where they connect to the clip (the black rubber sleeves slide off of pins that stick out of the clip). Also you don't need all 8 pins, just 6 of them. However I'm still getting an error that my software isn't finding the chip. So either I have a bad software driver for the USBasp, a bad USBasp, a bad flashlight driver, the clip isn't making good contact with all of the pins, or I didn't wire the clip correctly. Or something else. Right now I'm pretty stuck. I could bypass the clip altogether and try to solder ribbon cable wires to each leg of the Atmel chip, but that wouldn't be easy given the small size.


November 24, 2010

Find My iPhone

In a comment to my review of my iPod, I said the iOS 4.2.1 update only offered two incredibly minor improvements to the iPod software. However, another thing they introduced was "Find my iPhone" as a free service. If you lose your iPod, you can log onto an Apple website and it will show you on a map where your iPod is (though it looked like it was at the house on the corner across the street) and also have the iPod make noise and display a message. You can also lock the iPod or erase it completely if it has fallen into enemy hands. But if someone steals it, all they have to do is reset it to factory settings and they have a functioning iPod even though at least they can't get your personal information. It seems like Apple could set it to completely disable the iPod if it was reported stolen. Though that would mean there would be some overhead in keeping up with when you sell it or if Apple replaces it.

Anyway, the feature doesn't work as well with an iPod as an iPhone because the iPod isn't always connected to the internet like an iPhone, but I did a test in my house yesterday and it worked fine, with the iPod making a fairly loud sonar pinging noise and displaying the message "I'm over here, under the sofa!" (which I had told it to display; it wasn't actually under the sofa).

However it wasn't easy setting it up. First I had to set up a Mobile Me account and my existing iTunes account password wasn't good enough for Mobile Me and showed my e-mail address as unverified, but wouldn't send a verification message. But I changed the password under iTunes and got it working. You also have to set up a screen lock where every time you turn on the iPod you have to enter a 4-digit pin number. One option was to have it ask for the pin after 1 minute which I figured would be better since it would let me at least skip a song without having to log in. That lasted a few times before I decided I didn't want to have to enter a pin every time and I have disabled that. I don't know if that disables the Find My iPhone feature as well.


November 23, 2010

New Lower Gas Price

Today I filled up at Kroger. I was hoping to get through the whole month of November without filling up, but it wasn't going to happen. Anyway, I was entering the mileage in my spreadsheet and I noticed on the receipt that they charged. $2.590/gallon. I think this may be the first time ever in the US that I haven't been charged an extra 9/10ths of a cent for a gallon of gas. Last time I filled up with gas at the same Kroger, it was $2.479/gallon.


November 21, 2010

John Adams

A few years ago, HBO produced a miniseries about John Adams based on David McCullough's biography. I remember Andrew watching a little of this when we were staying in Williamsburg. I asked him why he was watching it and he said it was interesting. Go figure. It turns out it was a perfect movie to watch in Williamsburg (though really he didn't watch more than 30 minutes of it, I don't think; we stayed pretty busy) not least of all because they filmed some of the movie there. It also won 13 Emmy awards, though this is a little misleading since the miniseries category isn't nearly as competitive as, say, comedy or drama series. It stars Paul Giamatti who has played a lot of different kinds of roles, but most famously starred in Sideways where he was a whiny loser (or maybe "winey" loser, hee hee). The miniseries is on 3 disks, spanning 8 hours. It covers Adams from the Boston Massacre up until his death which took place on the country's 50th birthday, the same day that Thomas Jefferson died.

It is pretty slow going. John Adams isn't someone you learn that much about in school, and Giamatti plays him as being pretty shrill. We never learn what really made Adams popular enough to become president (although for only one term). Mostly we see him standing on his principles, but rarely getting along with people. He mostly succeeds in spite of himself.

But what makes the miniseries good is not John Adams, but the characters around him, including his wife Abigail, played by Laura Linney. Abigail is John's closest adviser and the biggest supporter. Benjamin Franklin is played well by Tom Wilkinson. Thomas Jefferson is presented as an enigmatic political philosopher by Stephen Dillane, who I had never heard of but is really good and grows on you over time. It is an interesting portrayal of George Washington as well, though it is not a big part and Washington doesn't say much.

So the setup is good in that you have this character everyone has heard of, but nobody really knows (unlike the others, he isn't on any money). In that way you get to see the comings and goings of all of these important people (and many others who aren't as famous). As I watched I would go look something up on Wikipedia to get the real story. The miniseries embellishes a little or plays around with some minor facts and timelines to fit the story, but the basics are all pretty much true.

I don't know that I can recommend this to anyone and the book is probably a better way to get to know Adams, but I didn't mind sitting through all of it and getting a different perspective on the founding of our country.


November 20, 2010

Black Cat HM-01 Warm

Black Cat HM-01

Summary:

Battery:AAA/10440
Switch:Reverse clicky
Modes:1
LED Type:Osram warm
Lens:Glass
Tailstands:Yes*
Price Paid: $7.82
From:KaiDomain
Date Ordered: 31 Oct 2010

Pros:

  • Warm tint is rare among budget lights
  • Pretty bright for this tint
  • Cheap

Cons:

  • Ringy beam
  • Only 1 mode

Features / Value: 3 out of 5

Some people really go crazy about neutral and warm white LED's. I have a couple of neutral lights and I will admit I like the tint better than the cool white of my other lights. They seem to show colors better. Some people take it further and like warm white lights even more. But while you may lose a couple of brightness bins by adding extra phosphor for a neutral tint, you lose significantly more getting a warm tint. Since most people don't know they have a choice and will pick lumens over everything else, the cool white lights are about all you can get from budget dealers. But then I saw a beam shot of the Black Cat taken by phlowcus here. I couldn't believe such a tint was available, but I still waited a while before ordering the Black Cat, appropriately on October 31, Halloween.

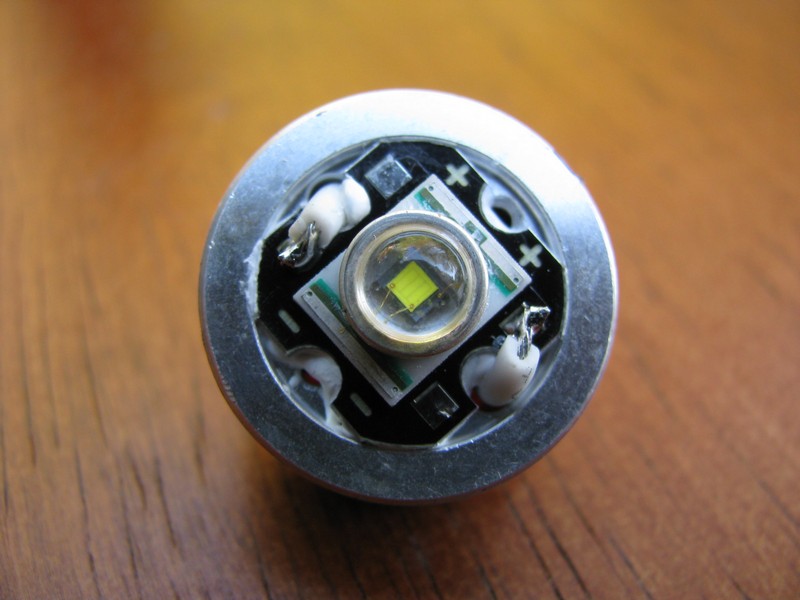
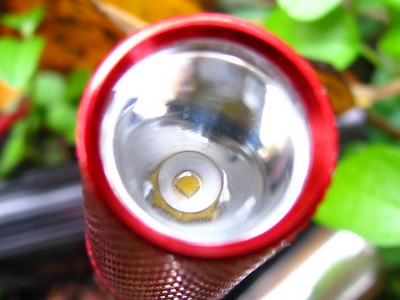
The light uses an Osram LED like the Uniquefire AA-S1 that so many people like. To play up on the German origins of the of the Osram, the LED is imprinted "From Gemany," but I doubt any German company would misspell the name of their own country, so it still screams Made in China.

Osram LED and smooth reflector

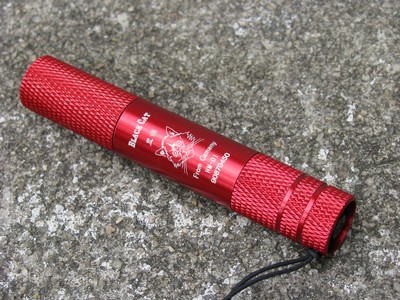
The light arrived from KaiDomain in the normal amount of time or faster, about two weeks. The light itself was in a white box inside a padded envelope. Attached to the light is a long lanyard with a detachable part. I'm not sure what the point of being detachable is, but I think it's still a nice touch. The light is available in red or black and since I have plenty of black lights and love irony, I ordered a red Black Cat.

DealExtreme has these lights as well, but they seem to be the cool white versions. KD has versions in both tints and body colors.

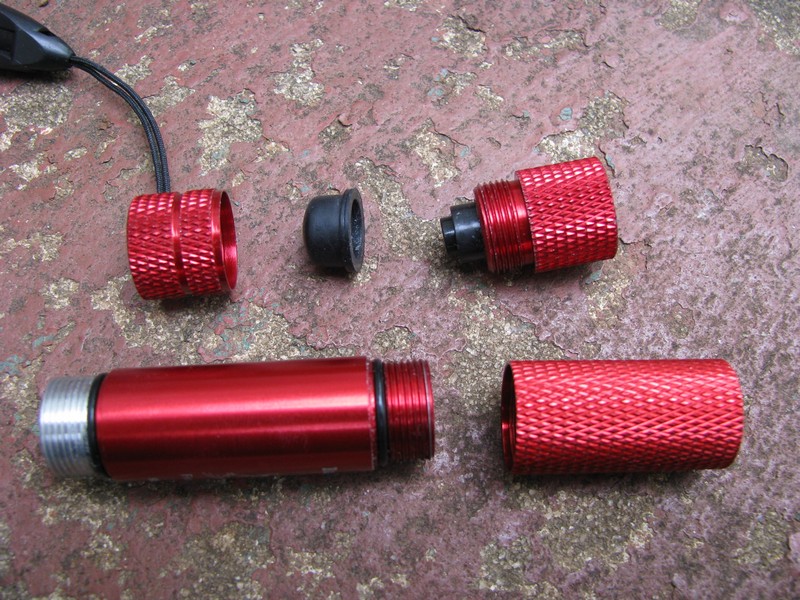
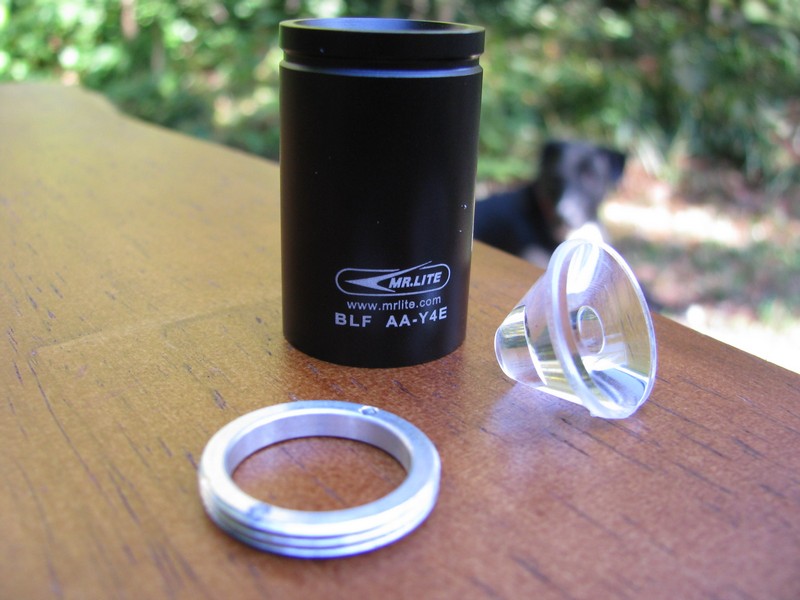
Here is the light tailstanding, but to do this you have to remove the rubber switch cover (any pictures in this article can be clicked on for a version twice the size):

Tail stands with switch cover removed

The first thing I did was unscrew the tailcap to put a battery in and I got my first surprise. The tailcap's only purpose is to hold a rubber cover over the tail switch. It doesn't provide access to the battery tube (there is a true tailcap that I found later). With the rubber cover in place, this light won't tailstand, but with the tailcap off you can pull the cover off, replace the tailcap, and the light tailstands just fine. I'm sure it loses water integrity, but if you want a tailstanding light, you can have it. Also, if the switch is too recessed into the tailcap for your fat fingers, you can remove the tailcap and do without it. So that's kind of neat.

Mostly disassembled

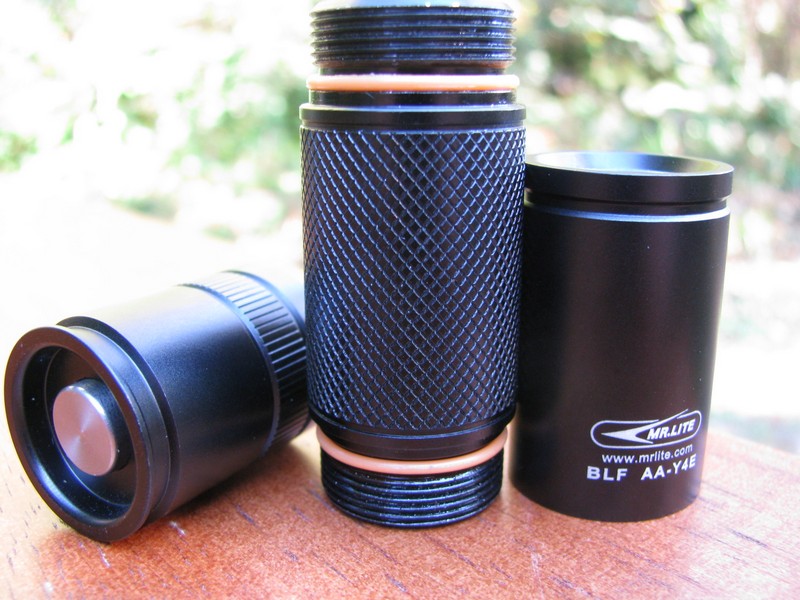
The next thing I did was remove the head and put a AAA NiMH battery in place and tried the light out. It didn't work. The problem is I really have to screw the head down tight in order to get a good connection between the body tube and the driver. Better lights will have bare threads for electrical contact and then the pill is bridged to the driver board. This way works, but I'm not crazy about it. Doing this I also noticed there was no lube on the o-ring and it really needs some if you're going to tighten the head all the way.

Disassembled with the tail off

Once I did that, I got a very ringy beam of orange-tinted warm LED light. This tint is way warmer than my neutral lights, but not as warm as the pictures indicate since there is some automatic white balancing going on. With the tail clicky and one mode, turning the light on and off is about all you can do with it. It isn't overpowering bright, but it is plenty of light for most uses. I don't know that the color rendition is really anything better than a neutral light. With the Fall colors out right now, everything outside is kind of yellow-orange anyway. I still prefer a neutral white light.

Build Quality: 4 out of 5

Build quality is pretty good. With the head tightened down all the way, I didn't have any contact issues. The anodizing is shiny, and there are a few flaws, especially where the parts fit together. In the smooth part there is an odd sheen to the light. I don't think the anodizing will hold well. The lens seems to be glass, but I don't have a good way to unscrew the pill and check it out because there are no notches to get a grip on. There seems to be a little dirt on the inside of the lens that I'd like to be able to get rid of. The light feels pretty light weight. There are o-rings at both ends of the body tube and they seem pretty tight. With the switch cover screwed down tight, I think this light should be pretty watertight.

Group: Trusfire XP-E F23, Black Cat HM-01, and iTP A3 EOS

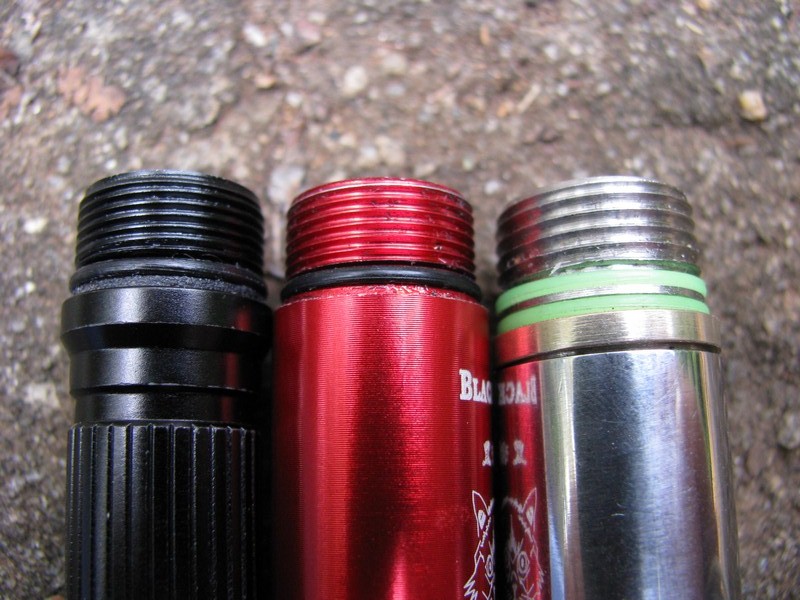
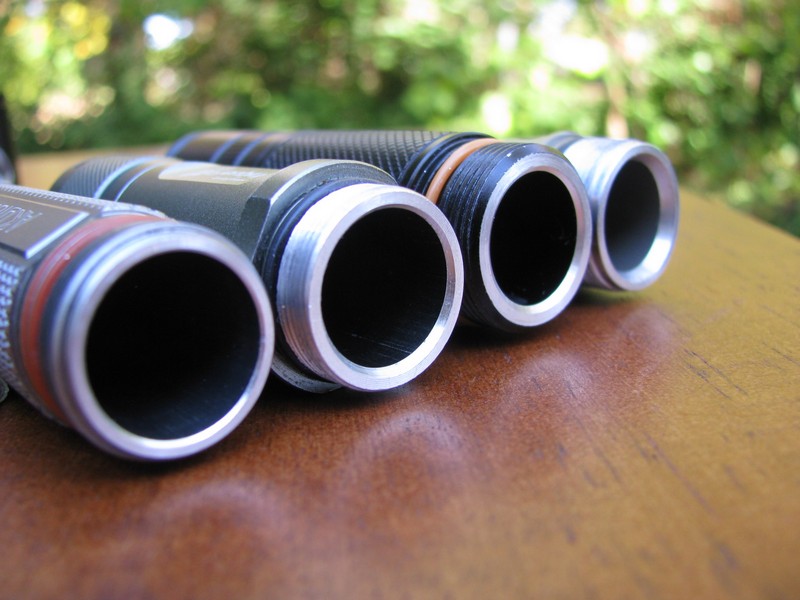
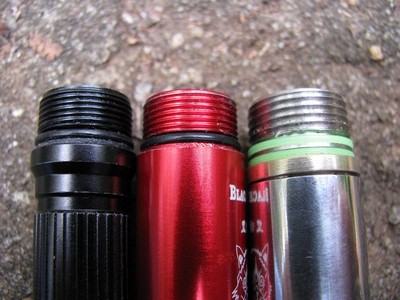
The threads of the three lights. The black iTP has the best threads, but I don't think the picture shows that.

Threads of all three lights

Battery Life: 3 out of 5

Battery life is decent, though you can't expect much from a bright LED on a AAA battery. I'm not sure what is going on with the current measurements. They fluctuate between 1 amp and 2 amps. So there is some kind of regulation that doesn't seem to work exactly right or maybe it is some kind of alternating current that gives me funny readings. I did the measurements below before I realized I could remove the tail cap. So those are measured with the battery on the head and a probe stuck down to the driver board. It was easier to get 1-amp readings. Later I repeated the test measuring current at the tail, but I would get 2-amp readings most of the time. Given that the battery has only 800mAh capacity and lasted over half an hour, I don't think the light is drawing 2 amps regularly. In fact, if it did it would get way hotter than it does and it is only getting warm.

With a 800mAh Duracell precharged AAA NiMH ("duraloop"), I was able to get 40 minutes of light before I went below 1V on the battery and brightness was really going down fast at that point. Here are the readings, taking measurements every 5 minutes. At each measurement, I turn the light off, measure the battery voltage without load, and then measure the tail current. I repeated the test with an 800mAh Eneloop and got 35 minutes, I think shortened because of the 2-amp readings I would get when testing the light.

Time (min)Battery (V)Current (mA)
01.3971050
51.2621100
101.2531130
151.2491080
201.2431130
251.2331150
301.217950
351.1712020 (!?)
400.932800 (falling)

Battery life is quite short with a lithium-ion battery, at least the unprotected blue Ultrafire that I just received. After 5 minutes the light was very hot, almost too hot to hold and the battery was half-depleted. Due to the small size, if you keep this light in your hand while it is on, it won't get nearly as hot, but I had it tailstanding on a table.

Time (min)Battery (V)Current (mA)
04.171060
53.80910
83.63720
103.60640

Amazed at the very short battery life, I tried my other 10440 battery that came with this one and got basically the same results:

Time (min)Battery (V)Current (mA)
04.171150
53.77950
83.65790
103.60710

Battery life isn't the strong suit of this light on lithium-ion batteries, but it is pretty respectable on NiMH batteries. Since the Trustfire lasts 15 minutes and this light lasts only 10 minutes on lithium-ion batteries, I'll give it two stars on lithium-ion, but it lasts 40 minutes instead of 30 minutes on NiMH so it would get 4 stars. Average it out and say 3 stars.

Light Output: 3 out of 5

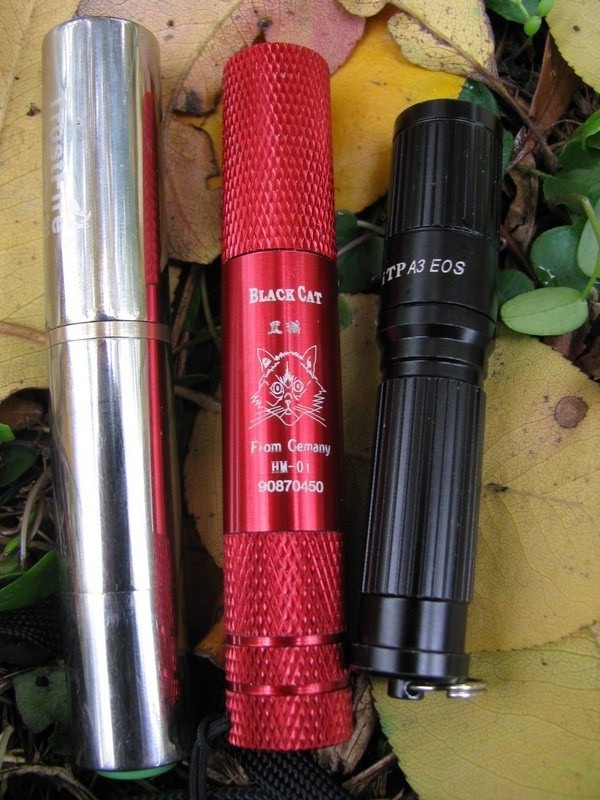
The light output is good for a warm white LED, but not as bright as some cool white LED's. I am comparing the light to two widely owned gems: the iTP A3 EOS and the Trustfire XP-E F23, two lights with Cree XP-E LED's instead of the Black Cat's Osram.

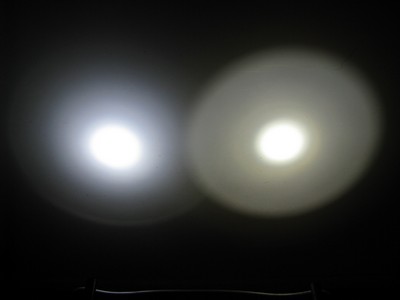
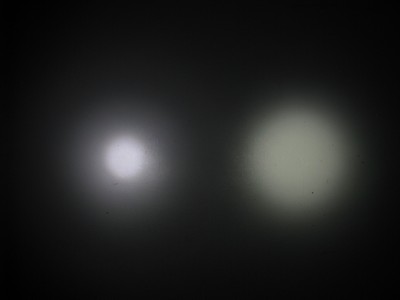
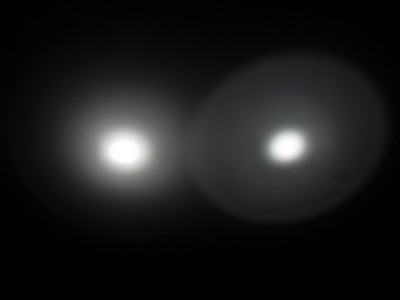
First, I want to show the tint outside with the Black Cat on the left and the A3 on the left, both with NiMH batteries, just to show the tint on vegatation:

Black Cat vs. iTP A3 EOS outdoors

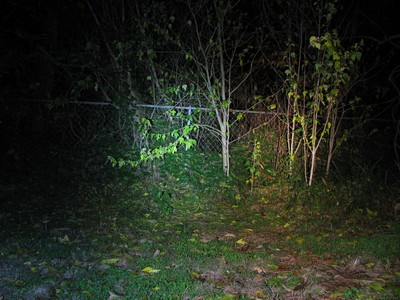
And so you can't accuse me of shining it on different colored plants, here is the same scene with the lights reversed:

iTP A3 EOS vs. Black Cat outdoors

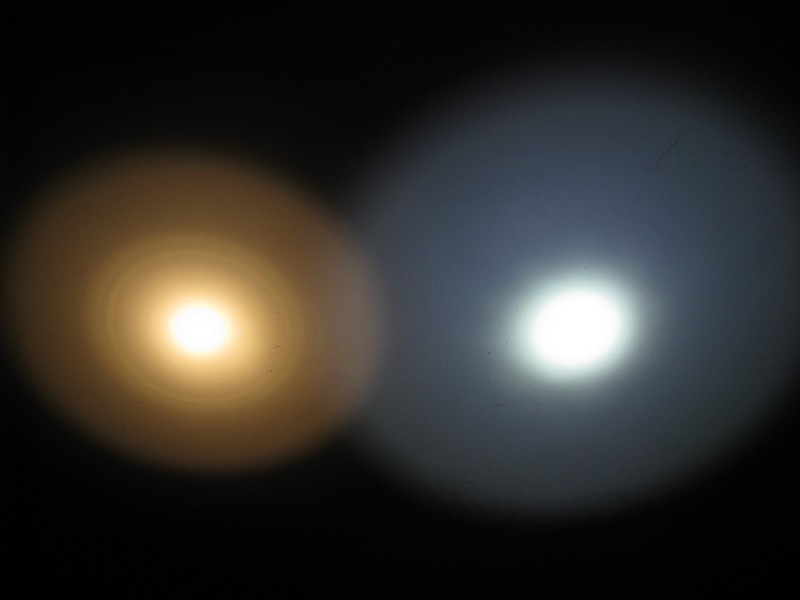
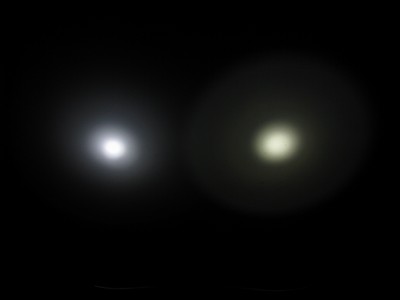
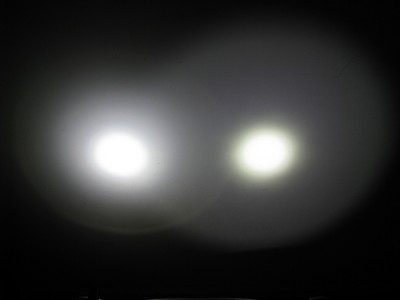
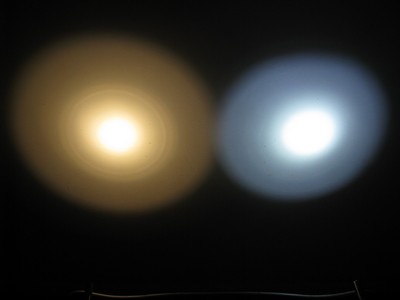
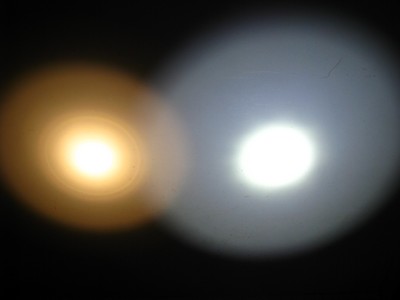
On NiMH cells, here is a comparison of the Black Cat (always on the left) and the iTP A3 EOS on High, taken at 1/25th second. Both lights are 50cm from a white wall. The iTP has a much wider beam, but the tints are exaggerated here by the camera's white balance (though it is pretty obvious that the Black Cat has a warm tint):

Black Cat vs. iTP A3 EOS 1/25th second

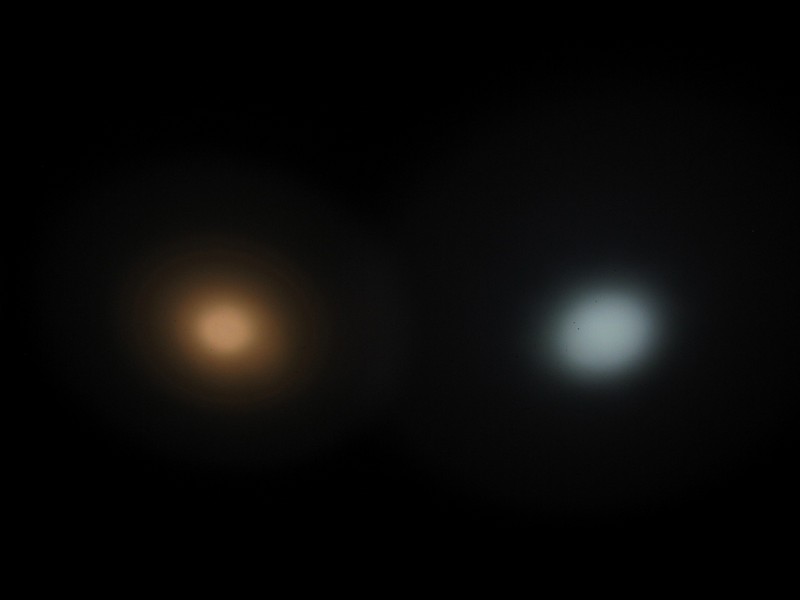
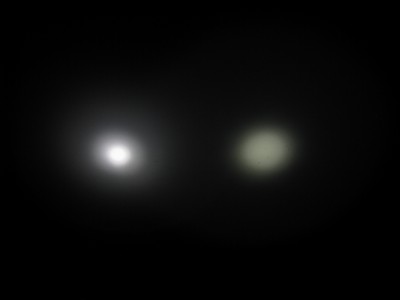
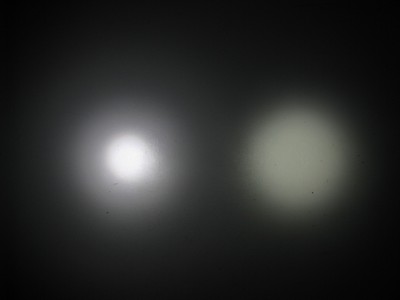
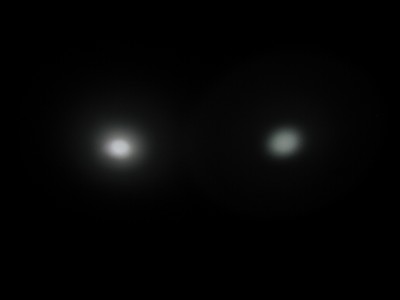
In order to get more detail about the beam, I will step down the exposure, but the lights are still on High. Here are the beams at 1/200th second:

Black Cat vs. iTP A3 EOS 1/200th second

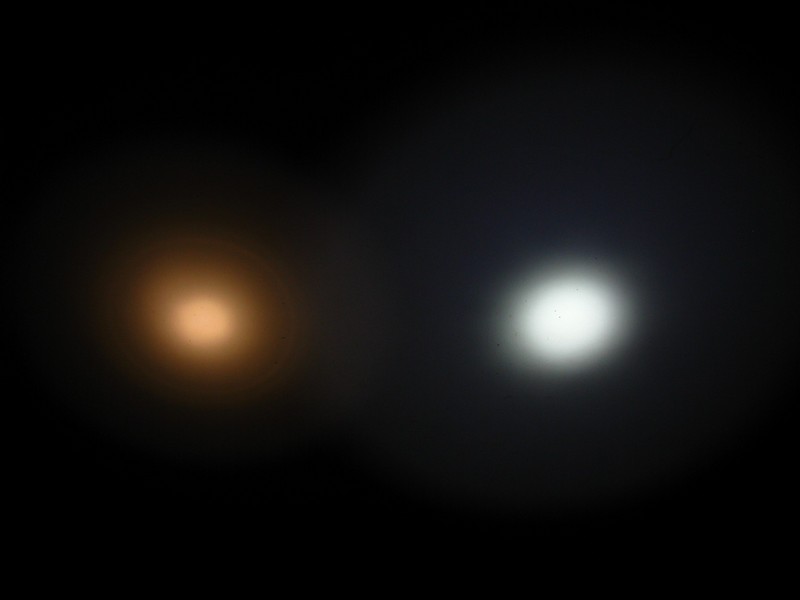
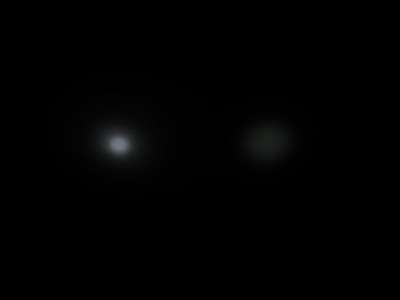
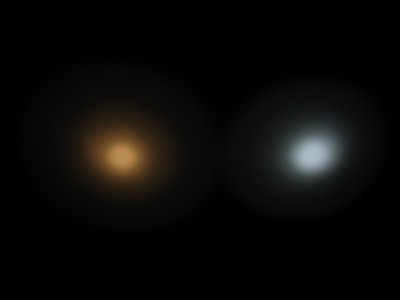
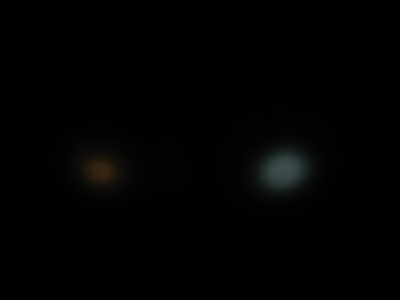
Now at 1/1600th second to get a comparison of the hotspots of the two beams:

Black Cat vs. iTP A3 EOS 1/1600th second

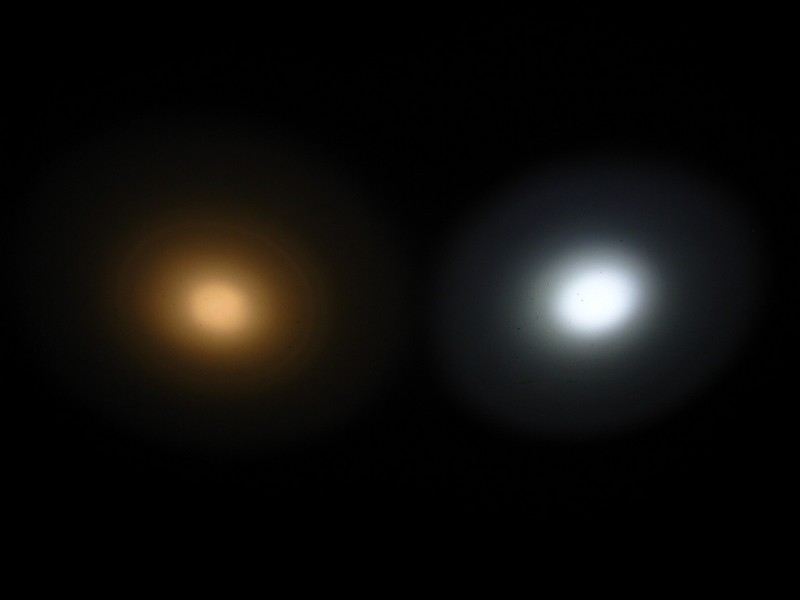
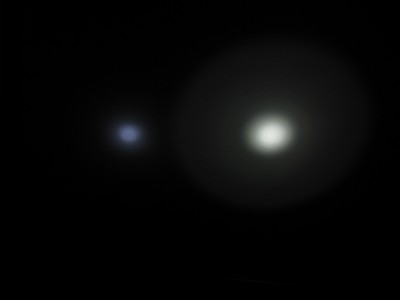
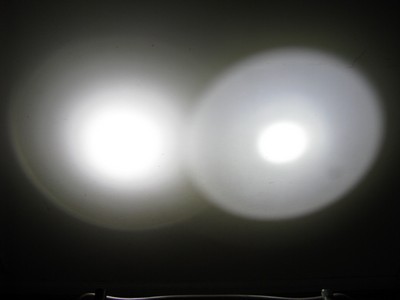
Now I'll compare the Black Cat HM-01 to the Trustfire XP-E F23, again on High only since the Black Cat just has one mode. The F23 has a tighter beam than the other two lights:

Black Cat vs. F23 1/25th second

Black Cat vs. F23 1/200th second

Black Cat vs. F23 1/1600th second NiMH

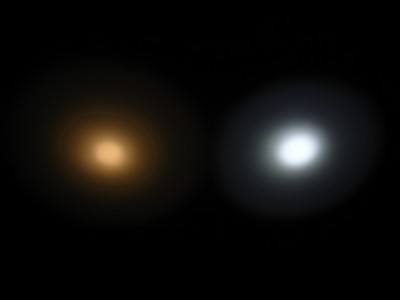
Now I put unprotected blue Ultrafire 10440 cells in each. I just got these from DX since my older ones don't hold a charge for more than a few seconds now. Starting with the Black Cat vs. iTP A3 EOS at 1/25th second:

Black Cat vs. iTP A3 EOS 1/25th second Li-ion

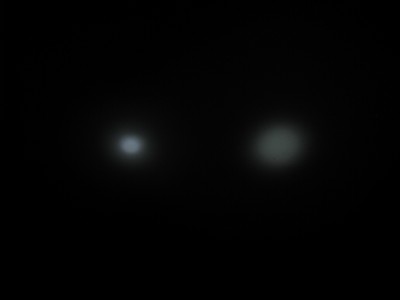
And at 1/200th second:

Black Cat vs. iTP A3 EOS 1/200th second Li-ion

Black Cat vs. iTP A3 EOS 1/1600th second Li-ion

Now against the Trustfire XP-E F23:

Black Cat vs. F23 1/25th second Li-ion

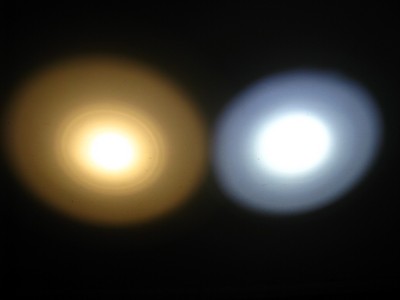
At 1/200th second, just not as bright:

Black Cat vs. F23 1/200th second Li-ion

And at 1/1600th second:

Black Cat vs. F23 1/1600th second Li-ion

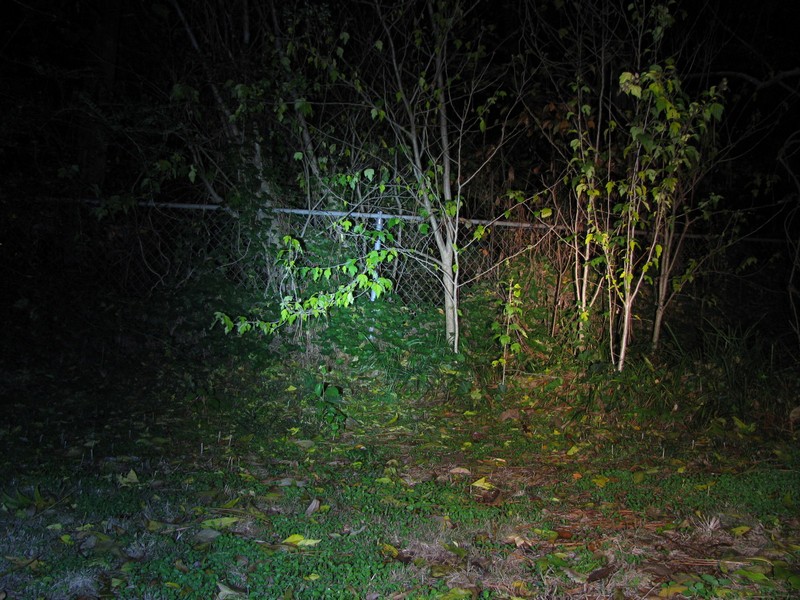
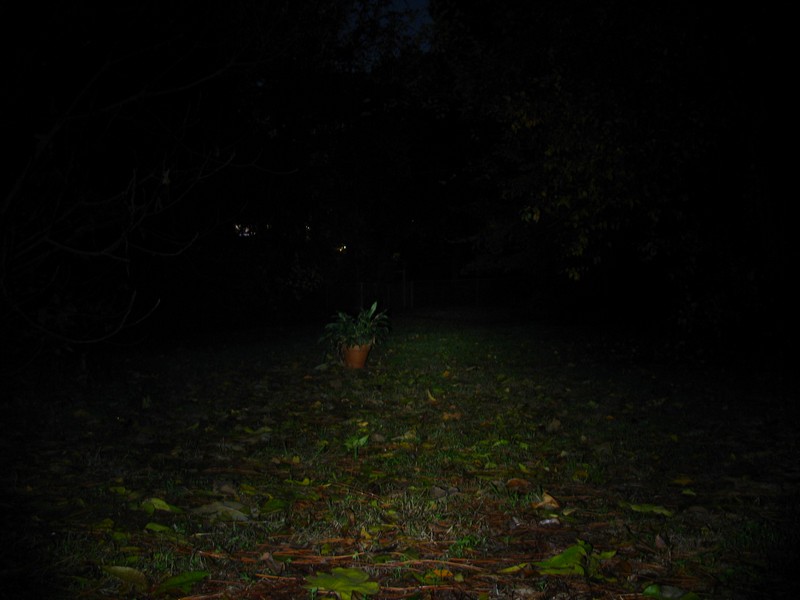
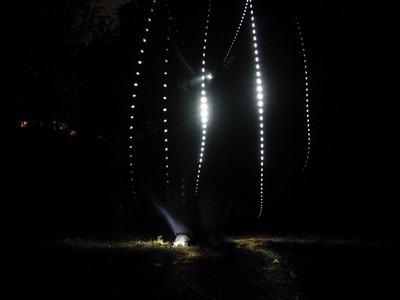
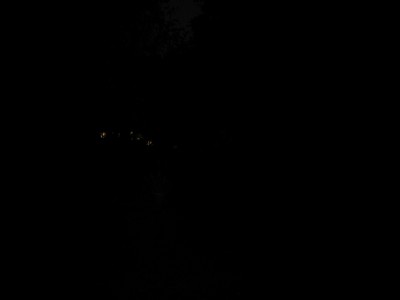
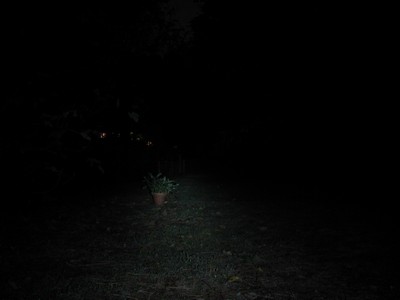
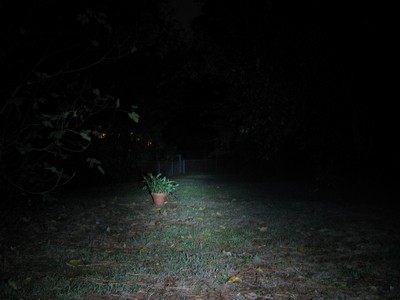
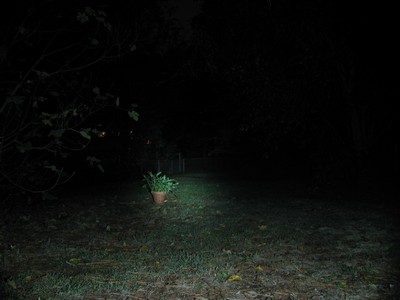
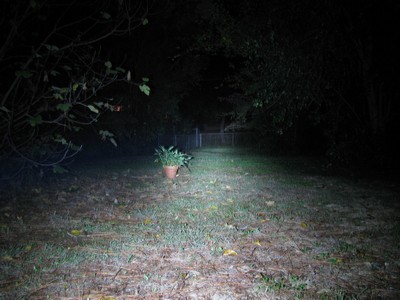
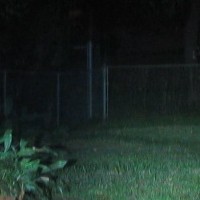
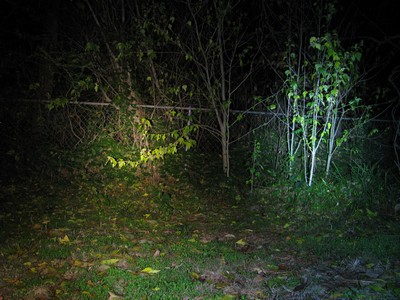
Now I'll take all three lights outside. The potted plant is at a distance of 25' and the camera takes a time exposure of 4 seconds to get a picture that looks like what you see in person. I've been playing around with the exposure and 4 seconds seems pretty good. With only one light in the picture, the auto white balance of the camera makes all of the lights look more neutral. First up is the Black Cat on NiMH:

Black Cat on NiMH

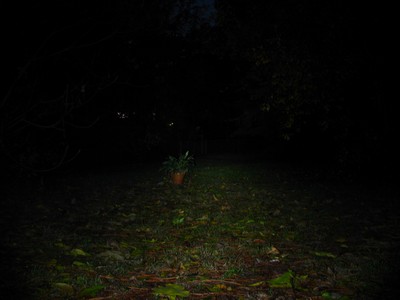
Now the iTP A3 EOS on High with NiMH (this is supposed to be about 80 lumens):

iTP A3 EOS on NiMH High

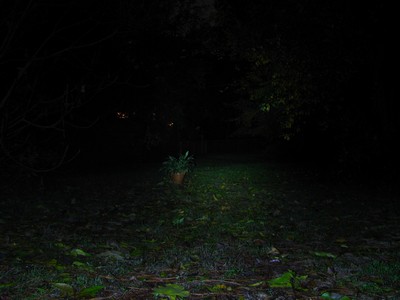
And the Trustfire XP-E F23 on NiMH; this one has a tighter beam and more intense hotspot:

Trustfire XP-E F23 on NiMH

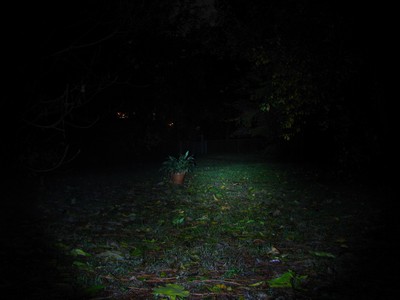
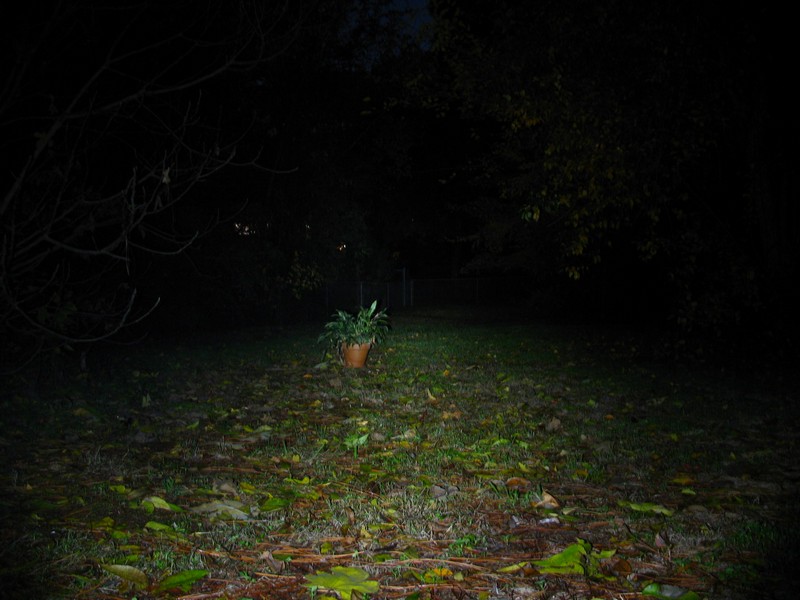
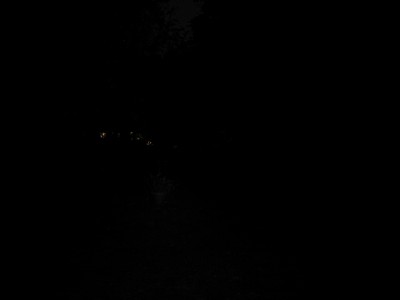
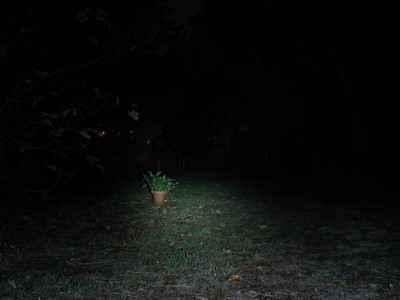
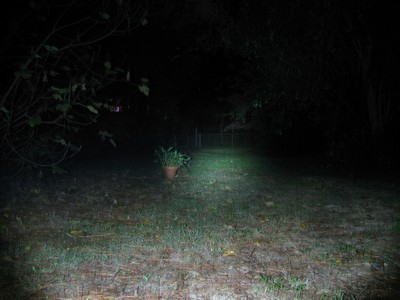
Now with a 10440 li-ion battery in each, starting with the Black Cat:

Black Cat HM-01 on Li-ion

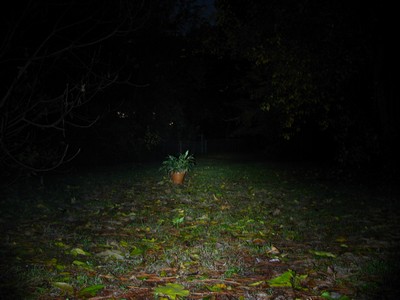
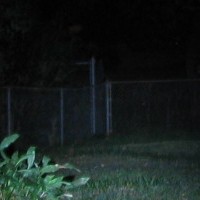
And the iTP A3 EOS on High with li-ion, this thing puts out a LOT of light on li-ion (200 lumens), shining all the way to the fence posts 120 feet away:

iTP A3 EOS on Li-ion High

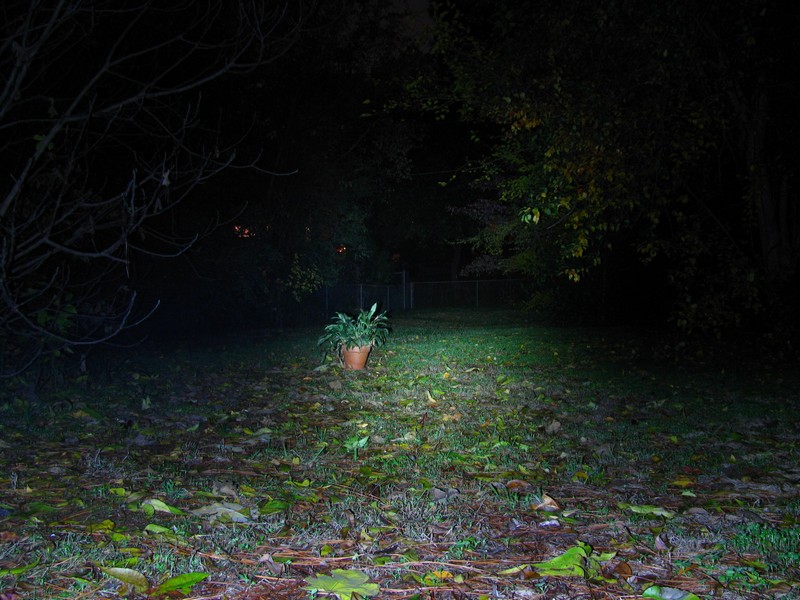
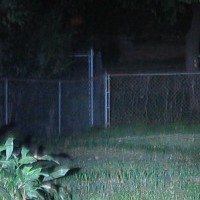
And the Trustfire XP-E F23 on li-ion, which doesn't produce quite as much light as the A3, but the throw is equal due to the tight hotspot.

Trustfire XP-E F23 on Li-ion

Even handicapped by a warm tinted emitter, the Black Cat holds its own against these lights. This is a nice amount of light.

Summary: 3 out of 5

If you love warm white lights, then this light is one you will want to have. Even if you just want to try the tint and see if you like it, it is so cheap that you can't really miss. I'm not entirely sold on the benefits of the orange tint and lower output though. The light also has some neat features like the versatile tail switch that is watertight by default, can tailstand if you take off the rubber switch cover, or you could remove the tail ring entirely and just have an easily accessed switch on the back of the light (not watertight). I still like the A3 and F23 lights more since both have modes. The F23 is heavier and longer and the A3 is shorter. The Black Cat is somewhere in between.

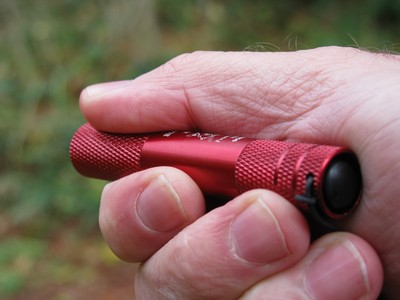
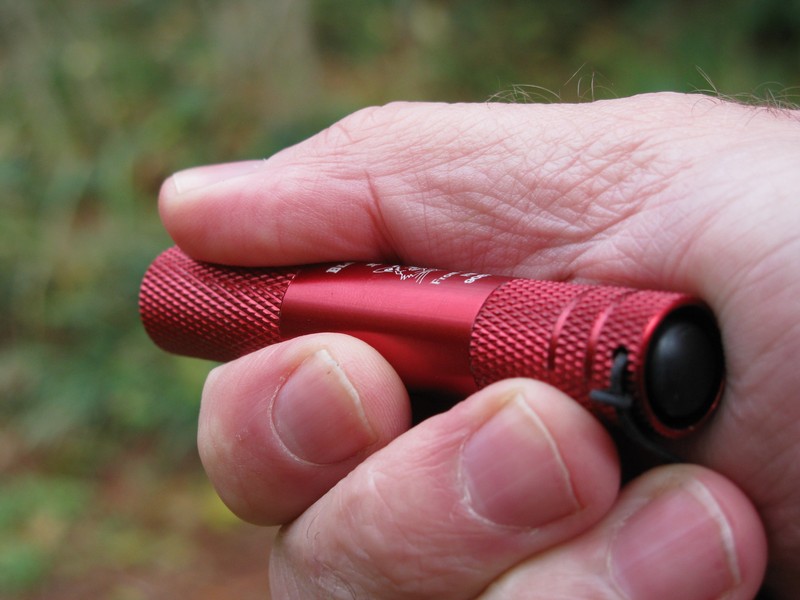
Here's the light in hand. This is the only picture showing the rubber switch cover in place. The length is just long enough to let you hold the light overhand and use the the tail switch with your thumb and the rest of your hand doesn't block the light.

Black Cat in hand


November 17, 2010

Win 7 Antispyware

Tonight Mom called and said she thought she had gotten some kind of virus disguising itself as anti-virus software. She kept getting a window popping up telling her to download some software. She knew that she wasn't supposed to do this and that McAfee was supposed to protect her from viruses. But McAfee had let this one through. [In fairness to McAfee, it turns out her subscription had expired several months earlier.]

This isn't a virus so much as it is a trojan and like so many of them, once it gets on your computer it is very hard to get rid of. By manipulating the Windows registry it prevents executables from running so that you can't install anything or run programs, and it stops you from getting to websites where you might find help or download fixes. Even if you can find the virus' executable files, they will reinstall themselves the next time you open your web browser or any other executable. Awful.


So Mom wanted me to help her get rid of it over the phone. The first help I found involved changing registry files and hopefully finding all the different names the trojan would hide under. I really didn't want to try that. But I found some advice on a McAfee support forum that seemed to be effective eventually (the post was from March of this year; it's now November and McAfee still isn't stopping its users from being infected by this thing or detecting or fixing it). It involved going to a page and downloading some other software. It seems like McAfee should catch the trojan by itself, but Mom was running a scan and it wasn't catching anything and at the end announced no problems were detected and her computer was clean, even while the big Win 7 Antispyware window was open on top of McAfee.

The person on the McAfee forum that had been infected had gone to the web page that had been suggested and unwittingly clicked on a Google ad at the top of the page for PC Tools. The PC Tools ad had a button saying Download Now. But really that just took you to PC Tools where they said you should buy PC Tools to fix your problems. Thinking that was the only way to fix his problem, the guy actually paid $50 for PC Tools and it didn't catch the trojan either. But below the PC Tools ad were the actual instructions on how to fix the problem. Part of the solution is installing MalwareBytes Anti-Malware, which is $25 shareware, but the free version will fix the problem.

Once you get into the real instructions, it is pretty straightforward. You download two files using an uninfected computer and put them on a USB drive (the laptop was infected, but fortunately the HP desktop was not, so she was able to get the files). Then you double click the first file, which is not an executable, but a .reg file. This file goes in and cripples the bad parts of the registry, I guess, allowing you to run the second file which is the MalwareBytes installer (an .exe file, which the trojan wouldn't let run until the reg file crippled it). The trojan still has its screen up the whole time, in fact the instructions say that if it isn't running that you need to get it running by starting your browser.

But the trojan doesn't do anything to stop the MalwareBytes installation and soon Mom had the software installed, updated, and was doing a full scan where it immediately started finding hundreds of bad records in her Windows registry (we would have never found all of those manually).

For some reason, after the first scan, the program started scanning again, so we closed the program, opened it again, did a quick scan, told it to fix whatever it had found, restarted as instructed, and now she is running a full scan again just to make sure it is cleaned out.

Anyway, it looks like a good solution if you avoid clicking the ads at the top of the page.

Here's the page:

http://www.bleepingcomputer.com/virus-removal/remove-antivirus-vista-2010

I don't think Mom should buy the full version of the shareware, but I did click on the two ads afterwards so the owner of the site would at least get something for his trouble.


November 11, 2010

Review: Mr.Lite BLF AA-4YE

Mr.Lite BLF AA-Y4E

Summary:

Battery: AA/14500
Switch: Reverse clicky
Modes: 4
LED Type: Cree XR-E Q5
Lens: Collimator (plastic)
Tailstands: Yes
Price Paid: $16.99
From:Manafont
Date Ordered: 25 Oct 2010

Pros:

  • Well made
  • Smooth threads
  • Very good throw
  • No flashy modes
  • Nice holster and lanyard

Cons:

  • Needed some repairs to work
  • No mode memory
  • Two low modes are too close together
  • Without lanyard it will roll


Features / Value: 4 out of 5

After hearing a lot about Mr.Lite flashlights and Manafont, forces were brought together for this customized version of the Mr.Lite J4 resulting in the Mr.Lite BLF AA-Y4E. It's basically a Mr.Lite J4, except the modes were picked by Mr. Admin based on polling results taken here at Budget Light Forum. In order to please those who like a super low Low and those who want a more usable Low, this light has two lows, Moonlight and Low. However the two modes are actually pretty close and the lowest setting is not a true Moonlight mode (less than 1 lumen).

It was fun to get our own light. You can read about the light in this thread and see whether people opted for black, silver, or both in this poll.

Originally the light was to come in retail packaging, but that got messed up and Manafont did a nice job of protecting the light, putting it in its holster then wrapping it and the lanyard in buble wrap, secured in tape, and then the whole thing was in a padded envelope. The holster has a carrying loop, a belt loop with a snap, and a velcro flap to keep the light secured in the holster. The lanyard is paracord with some adjustment beads and a clip with a split ring, but I don't know how I could get that split ring through both holes in the tail of the light. If you only put it through one hole, then it won't tailstand correctly. I may be able to get a slight smaller split ring which might be able to get through both holes.

NOTE: All of the pictures (except the beam shots) can be clicked on to open a version twice as large.

Lanyard, light, holster

The body tube fits an AA quite well. I could barely fit a flame Trustfire lithium-ion battery, but those batteries run a little long and won't fit at all in a couple of my other lights. The body tube itself is thicker than most lights. I imagine Mr.Lite will be able to use the same head and tail and swap out the body tube for a CR123A or 18650 light. This makes the light more substantial than other AA lights, but in a good way and it still fits fine in a pocket.

Collimator lens

The price isn't too bad for such a well-made customized light that also includes decent pack-ins. It's worth a couple of dollars just to avoid any strobes.The LED is a Cree XR-E with a Q5 bin. This is an older LED, but a good one that is still popular in budget lights especially where throw is desired. While a lot of lights have aluminum reflectors, this light has a plastic collimating lens that provides a small hotspot that throws quite well, better than my lights with reflectors. In Medium and High, the light takes a second to ramp up to full brightness, maybe like a slide coming on. It's not a bad effect. In the Low modes I can barely hear some buzzing from the PWM, but I only noticed it after someone else pointed it out. At least it isn't a high-pitched whine.

Fenix L1D, Mr.Lite BLF AA-Y4E, AKOray K-106

Build Quality: 3 out of 5

The build quality of the body is quite good, but I have to really knock the light for not working. It looks good, the light knurling and surface design looks very good, and the body tube itself is very thick. The o-rings were lubed properly and the threads are just butter smooth. The reverse clicky is metal and I'm not crazy about it. It feels like clicking a ball point pen and rattles just a little. I don't see how it could be waterproof so it might defeat the o-rings elsewhere.

Head disassembled with retaining ring and lens

Inside the light there is an aluminum pill with a full-size 17mm driver. I'd rather see a brass pill, but aluminum is fine too and my AKOray K-106 has an aluminum pill too. It was no problem backing the pill out (there are notches in the pill so you can get a grip with needle nose pliers) and again the threads are very smooth. The driver on my light was not soldered to the pill so I tried to dislodge the driver and get a picture of it, but there was not enough slack in the leads from the driver to the LED itself and I couldn't get a good look at the driver without unsoldering the leads. This lens is held in the head of the light by a threaded ring, so it is very secure. But there is no o-ring in front of the lens like lights with flat glass lenses usually have.

In the tail end of the battery compartment there is a piston instead of just a regular spring, which is a nice feature. It is pretty stiff though. The spring mounted to the driver is soldered on in two places and is so solid I was able to unscrew the pill by turning the spring. Here is the spring and the soldering I applied (the foreground blob works, I could never get the longer blob to bridge to the pill) to get a good electrical connection between the pill (which completes the contact between the negative end of the battery via the tail piston and body tube):

Bottom of driver board with new soldering

Comparison of barrel thicknesses (AKOray K-106, Uniquefire S10, Mr.Lite BLF AA-Y4E, Fenix L1D)

Barrels thicknesses

Battery Life: 4 out of 5

I did a run test using NiMH and then a lithium-ion battery. The way I test, which isn't totally accurate is I measure the battery voltage at rest, and then measure the tail current. I then run the light for 10 minutes, turn it off, and repeat the measurements. During the test the light barely got warm even though there was a pretty good current draw. I got an hour of good light.


Time (hr:min)Battery (V)Moon (mA)Low (mA)Med (mA)High (mA)
0:001.49040704102040
0:101.28840603701700
0:201.24340604001780
0:301.22240603801750
0:401.19740603901730
0:501.16040603601650
1:001.04140503201200
1:100.8734050210500

BLF AA-Y4E disassembled

On a flame Trustfire 900mAh lithium-ion battery I got 35 minutes of total runtime. The light got warmer, but not hot. I had a hard time getting consistent readings with my meter on High. I'm not sure if that is the driver, but I'll be interested to see Don's runtime graphs to see if there is an oscillation. It probably settles in after a few seconds, so maybe a graph won't show it.


Time (hr:min)Battery (V)Moon (mA)Low (mA)Med (mA)High (mA)
0:004.1820402401250
0:103.9120402401060
0:203.7720402501120
0:303.6720402701160
0:353.4820402801330

Cree XR-E Q5 LED

Light Output: 5 out of 5

The light output seems good, but it is hard to make a comparison because this light is geared toward throwing a small concentrated beam while other lights have a more dispersed hotspot. The pictures will bear that out pretty well and the BLF compares quite favorably. First there are some comparisons using a 2000mAh Eneloop NiMH. First I'll compare it with the Fenix L1D which uses the same LED, a Cree XR-E Q5 but has a smooth reflector. In these pictures the lights are 50cm from the wall and the BLF AA-Y4E is always on the left.

First both lights on High, using NiMH batteries, with the exposure at 1/25th second and ISO 100. The L1D has a somewhat neutral tint. The BLF is more of a cool white or maybe outdoor white, though not as blue as it looks here:

Y4E vs L1D NiMH High 1/25th second

Now at 1/200th second:

Y4E vs L1D NiMH High 1/200th second

Now at 1/1600th second. The BLF has a more intense hotspot:

Y4E vs L1D NiMH High 1/1600th second

Here is a comparison of both of these lights on their lowest settings, taken at 1/25th second. The Fenix is advertised as being 12 lumens on Low, so the BLF is significantly less than that.

Y4E vs L1D NiMH Low 1/25th second

Now to compare the light against the iTP A3 EOS. This light is much smaller, using a AAA battery, and can't concentrate the beam like the L1D. It also has a different LED, a Cree XP-E, but the same brightness bin of Q5. So here are both lights on High with NiMH eneloops at 1/25th second:

Y4E vs A3 NiMH High 1/25th second

Now at 1/200th second you can really see the difference in the beam patterns:

Y4E vs A3 NiMH High 1/200th second

And at 1/1600th second:

Y4E vs A3 NiMH High 1/1600th second

Now here are both lights on Low at 1/25th second. The iTP advertises a Low of only 1.5 lumens and I think the Y4E is a little bit higher, so maybe 2-3 lumens:

Y4E vs A3 NiMH Low 1/25th second

Here are two more shots comparing Moonlight mode and Low against the A3. This time the photos are taken at 1/5 second to exaggerate the brightness. Here is Moonlight:

Y4E vs A3 NiMH Moonlight 1/5 second

Now on Low. There is a distinct difference, but it's not much:

Y4E vs A3 NiMH Low 1/5th second

In attempting to get a moonlight mode, they really cranked up the PWM on Low. Here is a time exposure of BLF on the left vs. the original iTP A3 EOS, both on their lowest settings. I was moving both lights pretty fast up and down, but at the same speed, and you can see by the dots being spaced out further with the BLF that its PWM has a lower frequency. The stainless steel AAA Trustfire XP-E F23 has about the same PWM as the iTP. Later models of the A3 really improved the PWM.

PWM Y4E vs. iTP A3 original, both on lowest setting

Now I will do some comparisons using a lithium-ion battery, fully charged to almost 4.2 volts. First here is the Y4E against my Uniquefire S10 which has a Cree XR-E R2 (should be about 5% brighter than a Q5) running on direct drive off the battery:

Y4E vs S10 Li-ion High 1-25th second

Now at 1/200th second:

Y4E vs S10 Li-ion High 1-200th second

And at 1/1600th second. The Y4E has a more intense hotspot:

Y4E vs S10 Li-ion High 1-1600th second

Now to go outdoors. All pictures are taken at a 3.2 second exposure to try to get a picture of how it looks to the eye. The potted plant is 25' from the camera and the lights are pointed at the fence posts which are 120' away. First the Y4E using a fresh Eneloop on Moonlight mode (essentially a control shot; in real life it barely shone light on the plant):

Y4E NiMH Moonlight mode

Now on Low, you still can't see anything in the picture:

Y4E NiMH Low mode

Now on Medium you can start to make things out:

Y4E NiMH Medium mode

And on High you can see all the way to the fence posts:

Y4E NiMH High mode

Now here is a comparison of the Fenix using NiMH on Turbo setting, doesn't throw as well:

Fenix L1D High on NiMH

Now here is the iTP on NiMH at High, can't even see the fence posts:

iTP A3 EOS on NiMH High

Swapping in a lithium-ion battery, the brightness and throw go way up. Here is the Y4E on li-ion:

Y4E Li-ion High

Now here is the direct driven Uniquefire S10 on li-ion:

Uniquefire S10 Li-ion High

And the Fenix L1D on li-ion:

Fenix L1D li-ion High

Now here's a detail of the fence cropped from the original full-size photo. The first row is the Y4E on NiMH and Li-ion. The second row is the S10 and L1D on li-ion. For throw, this light is hard to beat. In fact, on NiMH the throw is very close to what the other two lights are doing with a li-ion battery:

Fence Y4E NiMH Fence Y4E Li-ion

Fence Uniquefire S10 li-ion Fenix Fenix L1D Li-ion

Summary: 3 out of 5

This is a pretty decent light, but not outstanding. I have to take off at least a star for the fact that it didn't work correctly without me soldering the driver board. That would take off all 5 stars for people who can't fix a light on their own. The light output is good. The light is geared towards throwing and does that pretty well, but I prefer a little larger hotspot. The metal tail switch is nice, but I'd prefer rubber and would feel more comfortable with it being watertight. The two Low modes being too close kind of make 4 modes pointless and just means you have to click an extra time to get to High. Also I think a light at this price should probably include mode memory. But I do like the fact that it has no flashy modes and that makes me more likely to recommend it to someone as long as I would be available to solder it if necessary.

Mr.Lite BLF AA-Y4E in hand