« July 2009 | Main | September 2009 »

August 29, 2009

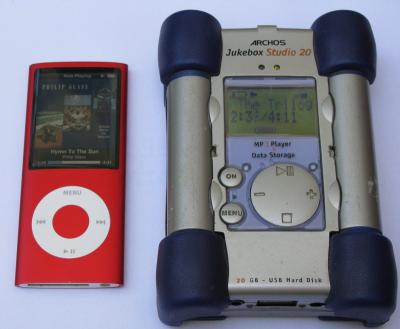
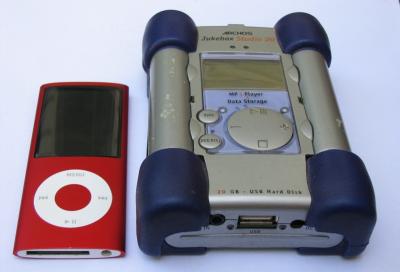
Archos Jukebox Upgrade

One of the advantages of the Archos is that it uses a standard notebook hard drive, specifically a 2.5 inch ATA hard drive (current notebooks use SATA drives which are not the same). So ever since I bought it, I knew there was the tantalizing possibility of upgrading the hard drive to something bigger than the original 20 GB. When I wrote an entry about looking for a cheap used hard drive, Jeb offered up his broken iBooks as possible sources of a new drive. One problem was he didn't remember how big the hard drives were and Apple doesn't give iBooks model numbers to help find out (Dell gives every computer a service tag which allows you to at least look up the original configuration for that specific computer).

Today Jeb brought three old iBooks over to Mom's, including one that was owned by Danny but was ruined because of water damage and therefore might have an unusable hard drive whereas the other two had problems independent of the hard drive. We figured out that one of the laptops probably had a 30 GB drive and the other a 40 GB drive. So we opened up the "dual USB iBook" using some online instructions I found. Other instructions said do not attempt a hard drive replacement with this particular iBook because it was simply too difficult. Fortunately, since I didn't have to put it back together and make it work again, I didn't have to worry about where the 50 or more screws I had to remove had to go and where all the parts would go again. It took an hour or more to get to the hard drive which was hidden under several layers of stuff that had to be removed from both the top and bottom of the notebook body.

ibookguts.jpg

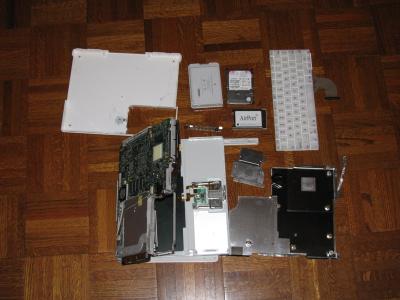
Once I was able to retrieve the hard drive (turned out to be a 40 GB Hitachi Travelstar) and undo some spacer bolts from the sides, I fit it into the Archos, which I had taken apart Thursday night by following some some good instructions and some better ones.

Now the trick is to format the hard drive since the Archos only recognizes hard drives that have been formatted using FAT32. The problem with that is computers running Windows XP or Vista won't format drives that way. So I had to use my old Dell Dimension 4100 that has Windows 98 on it. For some reason it would act like it was recognizing the Archos, but it wouldn't show up as a drive. I went into Device Manager and picked the properties for the disk drive, checked a box to make it removable, restarted the computer, and it would see the drive. I was able to format it no problem and I had about 38 GB available! Then I hooked it up to my laptop so I could put some music on it and try it out. I put the system files on it and a few songs. But after I disconnected it from my laptop and tried to play a song, I got some kind of error saying it couldn't save files and it asked me if the battery was low. I'd never seen that before. I tried a few different things and kept getting the same problem. Then I headed home. Jeb said he would just throw away the other iBooks, so I said I would take them and turn them in on an electronics recycling day sometime.

At home I reformatted the hard drive, did a thorough scan, and put files back on it and got the error again. So I downloaded the latest Rockbox software and put that on there and it worked no problem! I'm not sure why older Rockbox software isn't compatible, but I tried several older versions and none of them worked. The only thing I don't like about the new version is that it doesn't show me a % readout when I change the volume. I think it is supposed to show dB, but instead it just says "Vol: " with a blank space. The only way you know the volume is changing is by looking at the little LCD volume icon which only has 4 bars. I started transferring files over to it. It uses an older version of USB, so it doesn't transfer data that fast. One gigabyte probably takes about 20 to 30 minutes to transfer. The only thing about it is that I don't think the Archos driver is that good because if I go to Safely Remove the drive, I get a long, long delay. I tried shutting the computer down so it would finally release the drive, but I think it just takes about 10 minutes and you have to wait. Fortunately I won't have to do this that often.

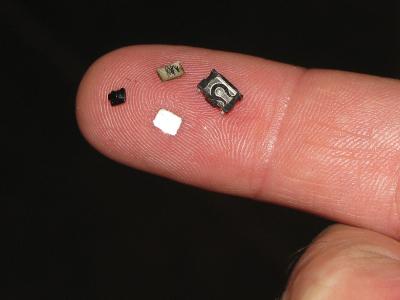
So this was pretty cool having a 40 GB MP3 player. But it was all just too easy. So I decided I should look up the serial number on Danny's laptop and see what kind of hard drive it might have. It was almost certainly 60 GB. I looked for instructions to see if it was easier to get the hard drive out, but it was almost an identical process as before (a little bit better, though Apple still hides screws under magnets and cables to make them hard to find). So 50 screws later I had a 60 GB hard drive, stuck it in the Archos, did the device manager thing again, formatted the drive, stuck the new operating system on it, transferred some music and viola! Now a 60 GB Archos!

ibookscrews.jpg

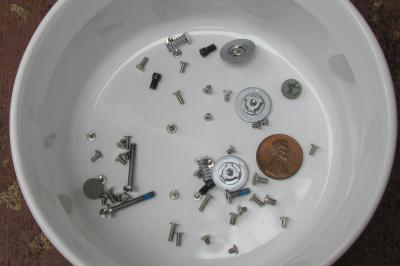
The picture above shows all of the screws I took out of the second iBook (not the penny, that is for perspective).

Thanks, Jeb!


August 24, 2009

Shipped from Hong Kong

This weekend I was contemplating how I could upgrade the hard drive in the Archos. It uses a standard IDE notebook hard drive (2.5"), so I was thinking it should be easy to come across a used 40-80 GB hard drive someplace. The instructions said the drive had to be formatted FAT32, which Windows XP and Vista won't do on hard drives that size, but older versions of Windows will. It was recommended to get an adapter to connect a 2.5" drive to a regular computer (3.5") and format it before swapping the old drive out, but I didn't have such an adapter and didn't want to anything for one since I would only use it once.

I went to eBay to look for used notebook hard drives and the search turned up these adapters. They were $1.32 with free shipping! I figured I couldn't afford *not* to buy one at that price (though later on I found them for 99 cents plus 6 cents shipping; so it always pays to keep looking). I don't see how they can afford to even send me something in the mail (it's pretty small though), and it is shipping all the way from Hong Kong.

Still haven't found a hard drive. I bid $23 plus $7 shipping for a used 60 GB hard drive, but the winning bid was $32.77 plus shipping. That's crazy! New 500 GB hard drives at Amazon are $90 with free shipping. They are SATA, though, and the Archos won't support that. Amazon may have some used hard drives for reasonable prices if I look hard enough.


Cell Library Manual

This entry is for something at work and is just so I can remember it later . . .

Using Microsoft Word 2007, modify the Heading 1 and Heading 2 styles by right-clicking the Style on the Home tab and choosing Modify. This brings up the Modify Style dialog box. At the lower left, hold down the Format button and choose Paragraph. In the Paragraph dialog box go to the Line and Page Breaks tab and check the box that says "Page break before". Do this for both Heading 1 and Heading 2. Heading 1 will be for each chapter and Heading 2 will be each cell.

Anything with Heading 2 will be followed by a picture of the cell and the description and instructions. But the Heading 1 page will blank except for the heading. Instead of having it blank, put a chapter contents table there. To do this you have to make one bookmark that encompasses all the cells in that chapter. So starting with the heading of the first cell, select everything until the end of the chapter, then go under the Insert tab and choose Bookmark. For Chapter 1, call the Bookmark "Section01". Now click the white space below Heading 1 at the beginning of the chapter and press CTRL+F9 to insert a field. You can't insert a Table of Contents from the menus because it only lets you have one of those, but you can do it with fields. When you do CTRL+F9 it will put you in a field with curly brackets {} around it. You want to type TOC \b "Section01" \h in between the brackets (\h is needed to make the page numbers hyperlinks when it is converted to a pdf). Then click somewhere else. Now right-click the field and select Update Field and it should give you a table of contents for everything you bookmarked.

I also wanted the manual to have the name of the chapter in the footer of each page. Each chapter starts with a different Heading 1, so click in the the footer and the Header & Footer Tools menu should show up. Hold down the Quick Parts button and choose Field. In the Field dialog box choose StyleRef in the "Field names" list. This brings up another list called "Style name". Choose Heading 1 from the style names. Now any time you use another instance of Heading 1 as the chapter name, it will show at the bottom of the page.


August 23, 2009

Archos vs. nano

I have owned both of these MP3 players for a while now. The Archos Jukebox Studio 20 since 2002 and the iPod nano 4G since 2008. I thought I would do a comparative review.

Form factor: The Archos is like a brick, weighing in at 10.2 oz compared to 1.2 oz for the nano. The Archos is 3.1 x 4.4 x 1.2 inches and the nano is 1.5 x3.6 x 0.24 inches. The nano fits in virtually any pocket and the Archos does not. Winner: nano

archos-nano.jpg

Display: The Archos has a 1.5 inch monochrome LCD screen with 112 x 64 pixels. The nano's screen is nicer: 240 x 320 2 inch screen with full color. Both display battery level and have backlighting. Winner: nano


Capacity: The Archos is 20 GB 60 GB and the nano is 16 GB. Neither can use this full amount after formatting. This is a nice amount of capacity. Winner: Archos.

Ease of Use: The nano uses iTunes which is a huge resource hog. While it is powerful and in some ways easy to use, it also greatly limits how songs are stored. The Archos is simplicity itself. You just put MP3 files on its hard drive and it will play them. If you have a bunch of singles, you can put them all in the same folder regardless of who the artist is. Since I have more music than either player will hold, I have to go through and check the songs I want to sync to the nano, but then these won't play in iTunes since it skips songs that aren't checked. With the Archos you just move songs over until it is full. If you want more room, delete some of them and put others on there. Both the iPod and Archos support playlists. Once the songs are on the player, the nano has the better interface and it is easier to navigate to songs, though you have to crank the touch wheel a lot to get through all of the artists or songs. With the Archos you can avoid some of that by using subfolders. With iTunes you are also constantly having to download 80 GB update files. Winner: Archos

Headphones: I got rid of the headphones on both of these. The nano headphones don't fit in my ears correctly and the Archos headphones were some silly behind the neck things. I like my Sennheiser CX-300 headphones, which can now be had for less than half of what I paid for them a couple of years ago. Winner: tie.

archosnano2.jpg

Battery life: This is probably about the same. Realistically I can get 10 hours out of either player. However, once the nano's battery no longer holds a charge, it is time to get a new nano. If the Archos batteries go bad, you can buy 4 more AA batteries. Winner: Archos.

Price: The Archos was $279 when I bought it and the iPod was $250. I had to pay tax on the nano which increased the cost and I wound up buying an AC adapter separately since one wasn't included. The Archos came with its own AC adapter in the box. Winner: tie.

Sound quality: I think the nano sounds better than the Archos, but that might be my imagination. If the Archos gets bumped a lot while playing it will eventually skip whereas the nano has no moving parts and never skips. Winner: nano.

In conclusion, both of these are good players with some pros and some cons. The nano won in three categories and the Archos won in three categories while they tied in a couple of others. Therefore it is a tossup.


August 18, 2009

New Vehicle from GM

Today, the head of General Motors, Barack Obama, announced an exciting new vehicle that will be offered soon. He expects millions of Americans to buy it.

Q: Mr. Obama, what type of vehicle is this? Is it a car?

A: We're not sure yet. We are pretty sure that it won't be a car. If you have a car today, you will not need this vehicle. We do not want to compete with automakers.

Q: Will it use gasoline?

A: No. It will be a clean vehicle.

Q: Will it be solar powered?

A: Maybe. Whether we use solar power, gasoline, or any other means of propulsion is still to be decided.

Q: I thought you said it won't use gasoline?

A: Look, gasoline has served us well in the past and you can get it just about anywhere. You can't really have a car without gasoline.

Q: Have you done any market research to see if people are interested in this vehicle?

A: We expect to sell 45 million of these vehicles. Because we are going to sell large numbers of vehicles, it seems pointless to do any market research. We will spend several months, if necessary, coming up with the design of this vehicle and then produce millions of them. There is no reason to try out different versions of the vehicle in different markets to see if any improvements can be made to it.

Alan Mullaley, the CEO of Ford Motors had this to say about GM's new vehicle: "Clearly this is a dangerous vehicle for both its driver and anyone close to it. The government wants to take away everyone's cars and force them to use these government cars which, as I understand it, will fueled by the blood of retired people. Although I have no information about this car, I am telling you now that it will destroy America."


August 15, 2009

Torx Screwdriver Set

To do the Palm repairs I wrote about, I needed some smaller Torx screwdrivers. Ace Hardware had size T3, T4, and T6, and above that, but I needed size T5. I went to Home Depot hoping I could get a set of driver bits or an individual screwdriver for five bucks or so. For $4.87 they had a set of 36 driver bits, an extension arm, and a screwdriver handle. It is called the Husky 36-Piece Precision Screwdriver Set. torxset.jpg In addition to Torx sizes T5, T6, T7, T8, T9, T10, T15, and T20, it had 6 small slotted head bits, 4 philips heads, 3 pozi heads, and 8 hex heads. At that price, and with a lifetime guarantee, how could I go wrong? Besides, that was the only way I saw to get a Torx T5 screwdriver.

The set is in a nice plastic case with each bit held in place and a clear front cover. But as soon as I put one of the bits in the screwdriver, I saw what horrible product design this is. The driver bits don't snap into place, they just slide in and are fairly loose. So if you hold the screwdriver with the point end down, the bit just falls right out. Put in the extension piece and they all fall apart. They're not even magnetized or anything. It is such a poor design that I am tempted to take the set back and get my money back (scratch that, I figured it out in Comment 4 below). The good thing is that I needed the T6 size too, so if I had just bought a T5, I would have been out of luck.


August 14, 2009

Palm Repairs

A couple of weeks ago the switch on my Palm TX stopped working. I did some searching and found a good post on a Palm forum by Woz of Oz (if it is not Apple co-founder and Dances With the Stars contestant Steve Wozniak, it is someone who wants you to think it is him) that said you can use the center button to turn on the Palm and get the clock pop-up, which leaves you in whatever program you were in last (whereas the Calendar, Memo, and other buttons turn the Palm on but take you to those programs). So I have been doing that lately. To turn it off you just wait a minute and it goes off on its own. I'm hoping Apple releases a nice update to the iPod Touch next month and I can use that instead of the Palm.

I also found a link to a repair that can be done where you take the Palm apart, then clean out the switch and if you get rid of the dirt that might be in the switch you can make the switch work again. It was on an Instructables page with pictures and some explanation, with comments from a few people who had done it successfully. Though it had pictures, the instructions were not as detailed as I would like. But I couldn't do them anyway because you need a tiny little Torx screwdriver (star shaped) size 5 and the smallest I had was a size 8 (which I used years ago to take apart my Powerbook 520c and do a hinge repair).

This week a guy at work asked me if I could fix an old Palm m515 that he found in a drawer nearly in mint condition. He has been using his m515 for years and it is showing its age, so he wanted to use this new one, but the problem was it wouldn't hold a charge (because it had been sitting in a drawer all this time and the battery charged all the way down to zero, never to return). It worked fine in a cradle, but as soon as you took it off the cradle, it wouldn't turn on. I said he could leave it with me and I would see if I could do anything with it. I found out that the battery isn't too bad to replace, but again I would need a Torx 5 screwdriver. So I ended up buying one which I will write about later. I had bought Susan a Palm m500 for her birthday one year, but she stopped using it eventually after the tap screen started doing weird stuff and gave it back to me before she moved. I found out it used the same battery as the m515 so I thought I could do a battery swap. A few years ago I had tried something similar with Palm V's and was not remotely successful, but the Palm V was glued together and you had to melt the glue with a hot air gun (if you weren't careful you would melt the buttons or screen instead of just the glue) and then pry the very well-glued battery off the back of the touchscreen, which I did too forcefully and wound up cracking the screen. Sad story, but now I have a working Palm V and my old Vx that I never use anyway.

Being able to take the thing apart with screws would make one part of it much easier. So I got the screwdriver and fortunately it was a set of different bits because it turns out the m500 uses a Torx 6 screw and the Torx 5 driver is useless for it. I took apart the m515 first since I had the least to lose with it and was surprised how easy it was to take apart. The plastic tools I had gotten with my iPod battery replacement kit were good for releasing the catches inside the case without bending the aluminum back. The battery was glued in place, but they used a lot weaker glue this time and it wasn't too bad getting it off of there. It also has a tiny little plastic plug so that you can just unplug the battery. Good job, Palm.

Then I opened the m500 and was able to get that battery out and plug it in to the m515, snap the case back together, put the screws back in, and it works like a charm! I put the bad battery back in the m500 and it is just as dead now as the m515 used to be.

Encouraged by this success I turned to fixing my switch. I was able to take the screws out easily enough, but the TX has more parts to the shell and some of the different circuit boards are connected together (though with tiny ribbon cable plugs, so you can get them apart fairly easily). Although the battery is fine now, its wire leads are soldered into the circuit board so it won't be easy to replace if that day ever comes. The Instructables page said to desolder the switch for cleaning, but commenters said you could pry open some holders and get the switch out without desoldering. This switch mechanism is super tiny with parts not much bigger than grains of sand.

txswitch.jpg

I used an eyeglasses screwdriver tip to pry the prongs and then the switch fell apart into 4 tiny pieces. They didn't look dirty and it took a long time to get everything back together. As I was prying the prong back to hold the switch in place, it broke off completely so the switch is completely shot now. It can't hold itself in place anymore. It wasn't nearly as easy to put the TX back together, but I was able to do it successfully. Now I will need to get that program that turns one of the buttons into a power switch that Woz of Oz was talking about.


August 7, 2009

Clean Air Champion

Today at work I won an award for being a "Clean Air Champion" (I got a certificate and a coffee mug). As part of the Clean Air Campaign, I have been logging the days where I do a clean commute. And since I take MARTA every day, then pretty much any time I go to work is a clean commute day (twice actually, since I go to work and then go home). The advantage of logging my commute is they have a monthly drawing where you can win a $25 gift card if you participate. I have won at least 3 times, but nothing in the last year.

So I got an e-mail this week saying to meet in the lobby with the other 25,000 pound champions. By their calculations, I have saved 25,000 pounds of pollution with all of the clean commutes I have logged. I did a similar calculation when I wrote about 10 years of MARTA cards, coming up with 2,000 gallons of gasoline saved in 10 years. Now a gallon of gas only weighs 6.3 pounds, so if all of that turned into pollutants, it would only be 12,600 pounds in 10 years. But I found a government website that says one gallon of gasoline actually produces 20 pounds of carbon dioxide when it burns because every carbon atom in the gasoline is combining with two heavier oxygen atoms from the air. So that means in 10 years I saved 40,000 pounds of CO2. And with the time I rode MARTA before I started collecting cards, and the time since I wrote that blog entry, I am probably up to 16 years or more of clean commutes.

So I really am a Clean Air Champion.

commute.jpg